Pages

Mar 25, 2014

Knit Tip - Hems...Hmmmm

A beautifully prepared and finished hem enhances the look of any garment whether working with knits or woven fabric. In this blog, I'll focus on knit hemming techniques. But because a knit is by nature stretchy, sometimes achieving a nice, flat edge to hem can be challenging.

In a nutshell, here are some of your options:
  • If the knit doesn't run, some can be left just as the cut edge.
  • Some knits will do well with a serged/overlocked edge, turned up 1/4" and topstitched.
  • A decorative (serged) rolled and stretched lettuce edge might be appropriate for some garments.
  • Perhaps simply folded to the inside and bonded with a fusible web will work for some knits.
  • Consider using a blind hem for more stable double knits.
  • Some knits will require stabilizing first - particularly those where the cut edge tends to curl. Then once turned to the inside could be cover stitched - if you have a cover stitch machine option.
And though I don't (currently) have photos of all options, let's take a look...


This is a slinky-type jacquard knit. The drape is lovely, it has a beautiful hand and is a stable knit - meaning it does not run. Because the hem goes up and down and up and down, it would have made it challenging to sew even a narrow 1/4" turned hem.

The solution - leave the cut edge as is.


Here's a close-up of the cut edge. (I wish I'd bought more of this fabric in different colors - hind sight is always 20/20).


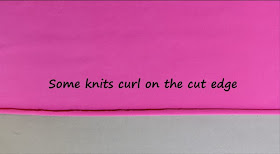
Next you'll see a much thinner knit where the edge is beginning to curl.


Some knits curl considerably more than this example.


And even though this next knit wasn't particularly 'curly', the fabric itself is quite thin and for a really nice hem, I stabilized it. I'll show you how
This is a 1 1/4" wide strip of iron-on fine, fusible interfacing which I fused to the inside of the hem edge.


If you don't have a pre-cut roll of fusible interfacing, you can cut your strips from yardage. This roll is pre-cut at 1 1/4" wide. I wanted a 1" wide hem, so I very carefully trimmed away 1/4".


Then press the 1" hem toward the wrong side.


I used the Cover Stitch option on my BabyLock Evolution. This is what the inside looks like.


I love this Cover Stitch option. As long as your hem is perfectly lined up, the result is 2 perfectly spaced rows of stitching...just like in ready-to-wear. And by having added the fusible interfacing at the edge of the hem, the fabric laid flat and stable throughout the stitching process.


The outcome was just what I intended it to be.


Kindly,

Glenda

P.S. The side of the hem hikes up slightly on the right side. This was intentional. I inserted shirring elastic on the right side seam only which results in a slight asymmetrical drape at the hem - all part of the plan!

Mar 18, 2014

Knit Tip - Where's the back of my pants??

Have you ever put your pants on backward and wondered why they felt so uncomfortable? I think we all have. When you sew them (knit pull-on pants), it's often difficult to distinguish front from back unless you stop to compare the crotch lengths.

This is a simple, decorative technique to help you quickly identify center back of your pants waistband.

Make sure waistband piece is cut the size that you need: 2 times the width of elastic plus seam allowances.
With short ends together, sew waistband in a circle creating the CB seam. Fold lengthwise with the seam to the inside and press a lengthwise crease indicating the top edge of the waistband.
Designate one side for the inside of the back of the pants. Stabilize the area to be stitched with tear-away stabilizer or iron on interfacing.

With waistband unfolded, stitch over the seam using a decorative stitch pattern in contrasting color.


Here's a short video talking about this simple knit tip.


Enjoy....
Glenda

Mar 11, 2014

**News Flash! - Bodice Fitting Course on DVD

I'm interrupting the short Knit Tip blog series for this important news flash!

The Bodice Fitting Course on DVD is finally done and available for you.  After many requests and with your enduring patience, we have finally produced this bodice fitting course to help you get an excellent bodice fit with your Sure-Fit Designs Dress Kit.


This short video gives you highlights of what's in the course and what you can expect. Please click on this link:

http://youtu.be/lQ50qAEp7Yk

This 2-DVD set, with 3.5 hours of instruction, is really the next best option to being here in Oregon with me in one of my Fit & Sew Retreats.  I know you'll benefit a lot by following along as I take you through the entire process of drawing off your SFD bodice with the Dress Kit.  For those of you reading this blog who don't yet have your SFD Dress Kit, you will need that along with the Designing Stylus and some tracing vellum.  If you follow the highlighted links, they take you to the respective pages on the Sure-Fit Designs website.

I'm offering a Pre-Order Special where you'll receive a 20% discount.  The new DVD course is regularly $59.95, but until March 31, 2014, if you enter Discount Code: BFC20 while in the Shopping Cart, you'll receive the discount.  The special price is $47.95 (+S&H).
Just click on this link to purchase yours - SFD Bodice Fitting Course on DVD


I'll share with you the insider tips that I talk about in my fitting classes.


You'll be shown 4 extra measurements that help you to drill down and truly personalize the first draft of your bodice.


There are 16 Lessons as well as 52 insider Pro-Tips to help you on your road to bodice fitting success.

And, there is even a lesson on designing with your blueprint.  You'll see the multitude of styles and fashions you'll be able to achieve no matter your body shape, lengths and circumferences.

I'm sure you'll enjoy this new Bodice Fitting Course on DVD.

Kindly,
Glenda

Mar 4, 2014

Knit Tip - Joining Waist Elastic


This is a very simply tip to eliminate unnecessary bulk when sewing pull on pants with elastic in the waistband. Just follow these easy steps.

1. Cut a piece of muslin or stable cotton/poly blend fabric the width of your elastic by 3 inches. ie: If using 2" (5cm) wide elastic, cut stabilizing fabric 2" X 3". (5 x 8 cm).

2. Measure and cut your elastic to go around your waist. But make sure that is is cut exactly the measurement you need and test it to ensure that it will pull up comfortably over your hips yet not be too loose at the waist.

3. Make sure the elastic is cut with evenly squared edges.

4. Butt the edges of the elastic together. With the stabilizing fabric underneath, pin the elastic to the fabric, keeping ends of elastic as close together as possible.
5. Zig zag or straight stitch fabric to elastic keeping the edges of the elastic butted together in the middle of the fabric rectangle. Sew in a square shape and then reinforce by sewing an "X" in the middle of the square.


6. Trim off excess muslin about 1/4" from stitching.
The results are sturdy, lay flat and reduce bulk.


Here is also a very short instructional video showing you this simple process.

Blogger isn't letting me give you the video directly on this page, so here's a link to the video - takes less than 5 minutes to watch. Enjoy!

http://www.youtube.com/watch?v=RPRpjkFJ8PQ

I'm sure some of you already use this technique, but for some of you, this may be new. It's great - give it a try!


Kindly,


Glenda