
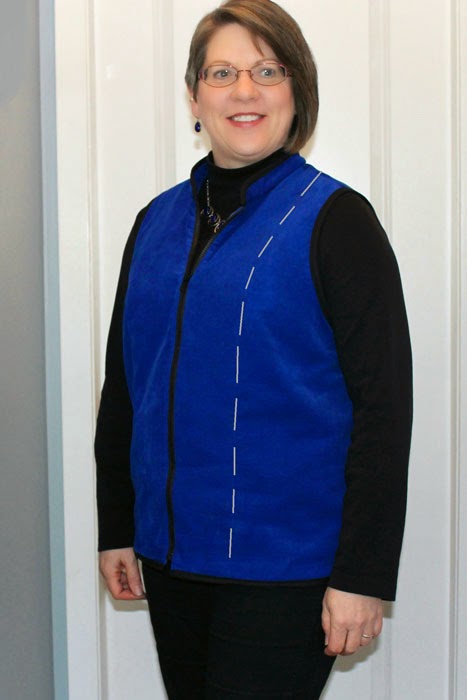
Vest Success continued...
In case you are wondering what to do with your back shoulder dart (if you have one)...see how to transfer it into a back yoke. One of our SFD ladies designed the Reversible Vest (a relatively new SFD downloadable Fashion Leaflet). This particular lady had a back shoulder dart that she needed to deal with. She needed the back shoulder dart for her slightly rounded shoulder blades, but didn't want the dart appearing in her vest. When drawing the vest pattern, she simply transferred this dart into the armscye and the resulting slightly curved seam took care of the dart and she ended up with a yoke detail in the back of her vest.


Because her photos were somewhat dark, I simply outlined the stitching lines that she designed. Now you can see where the back yoke is.
First, let's review how to add a back shoulder dart.
Step 1: Draw line A to B as illustrated. This line should be at a level where the most rounding or protruding fullness is on your back/shoulder blades. Then draw line C to D as shown. This line does not have to be at a right angle to A-B, but the angle that you choose will affect the final position of the dart, therefore, it should be at a pleasing angle for your specific body shape. You may need to sew a couple of tests to make sure you're pleased with the results.
 Step 2: Cut from A to B and from C to D, leaving a paper hinge at the armscye point B and at point D on line A-B.
 Step 3: Spread the shoulder area of the pattern open as shown always maintaining the paper hinge points. This will open up a small dart shape in the shoulder seam line and will automatically lengthen CB. Often people with rounded, protruding shoulder blades also have some rounding at the upper back and this extra length will help the bodice back to sit more comfortably. Additionally, depending on how rounded your entire back is, you may also want to add a CB seam which is shaped/curved to suit your body contours.
 Step 4: The more you open/lengthen CB that results in a wider dart, the more the upper and lower center back line becomes 'jogged'. To maintain CB on the fold of the fabric, simply draw/true a new CB from the back neck point to the waist point. Also re-establish a parallel straight of grain marking. Depending on how accurately you measured your CB waist length and where this length is actually needed, you may now need to shorten CB at the waist edge and gently true from CB to the side seam.
 Step 5: This technique for adding a shoulder dart shouldn't distort the armscye significantly. However, if the armscye appears to angled at the armscye hinge pivot point, make sure to blend/true to create a smooth curve.
 This is what it looks like in 'real life'.
Now, on to changing this back shoulder dart into a back shoulder yoke that is slightly curved. It really is a simple process. Please watch this video to see how to accomplish this technique.
Just click on the forward arrow to begin play. It's a short video and a simple process. I know you'll find it easy to do.
Kindly,
Glenda...the Good Stitch!
In case you are wondering what to do with your back shoulder dart (if you have one)...see how to transfer it into a back yoke. One of our SFD ladies designed the Reversible Vest (a relatively new SFD downloadable Fashion Leaflet). This particular lady had a back shoulder dart that she needed to deal with. She needed the back shoulder dart for her slightly rounded shoulder blades, but didn't want the dart appearing in her vest. When drawing the vest pattern, she simply transferred this dart into the armscye and the resulting slightly curved seam took care of the dart and she ended up with a yoke detail in the back of her vest.


Because her photos were somewhat dark, I simply outlined the stitching lines that she designed. Now you can see where the back yoke is.
First, let's review how to add a back shoulder dart.
Step 1: Draw line A to B as illustrated. This line should be at a level where the most rounding or protruding fullness is on your back/shoulder blades. Then draw line C to D as shown. This line does not have to be at a right angle to A-B, but the angle that you choose will affect the final position of the dart, therefore, it should be at a pleasing angle for your specific body shape. You may need to sew a couple of tests to make sure you're pleased with the results.


Now, on to changing this back shoulder dart into a back shoulder yoke that is slightly curved. It really is a simple process. Please watch this video to see how to accomplish this technique.
Kindly,
Glenda...the Good Stitch!


