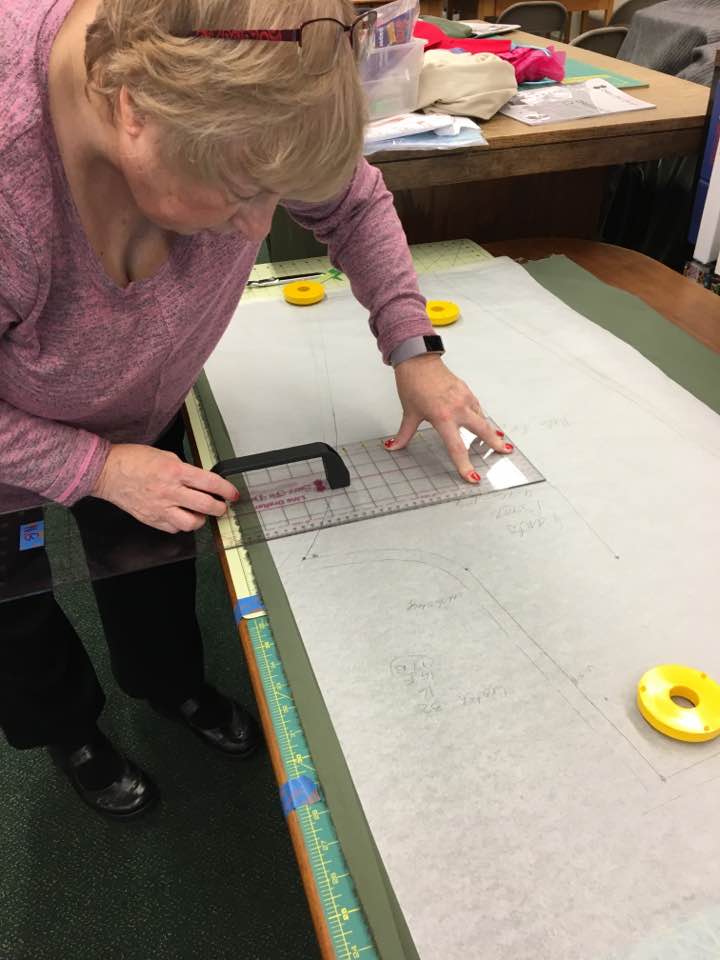
Whether you are a crafter, quilter or garment seamstress, you'll love this latest essential tool...the Line Drafter. An attached handle gives you that great grip offering extremely easy maneuverability and insuring a steady edge for drafting or cutting all the lines you need.
You'll get a good grip...it will never release (like suction cup handles often do). You'll obtain precision and accuracy with every drawn or cut line, on vertical or horizontal surfaces, which all ensures accuracy and success with all your projects! And yes...it's stable & see-through.
We're introducing you to this essential tool with a grand opening offer:
Specifications:
1. 24" x 6" (61x15cam) - which is great for long grainline markings
2. 1/8" thick clear plastic - it's see-through, rigid & stable for easy maneuvering
3. Offers both rules - Imperial (inches) and Metric (mm & cm) for our international customers
4. Has 5/8" (16mm) seam allowance guide on both long sides
5. Has 3/8" (10mm) seam allowance guide on one short end
6. Has 1/2" (13mm) seam allowance guide on the other short end
7. Offers 45 degree angle lines for all your true bias lines and cuts
8. Has 1" (2.5cm) grid lines making drawing parallel lines a breeze
9. It's all about the Handle: The Line Drafter features a permanently attached handle making maneuverability fast and easy on both vertical and horizontal surfaces! The handle depth is ideal for a woman's hand to get a solid grip, and yet deep enough for a man's (larger) hand. And...it's not obtrusive or too large so that it doesn't obscure the ruler markings.
If you'd like to see a short video on the multiple uses of the Line Drafter, click this video link:
Before summer was totally over, my intention was to sew up this BRIGHT patterned fabric into a pair of princess seam pants...and they're done! Let's take a look.
The Front...
The Side...
The Back...
Since the floral pattern kind of camouflages the princess seam up the center of the back leg, here's a close up view.
The princess seam gives you an opportunity
to sew shaping into the back of your pants and anyone with a flat butt
will really appreciate this design and fitting feature. Even ladies
with larger hips in relation to thin legs, the princess line really
helps to shape the back of the pant leg to your body contours.
Here's a video on how to add the princess seam to your pant leg:
In case you're not able to see this video in your email software, here's the YouTube link
The instructions for drawing and sewing this style of pant is actually found in the designing book - Pants that Mix n Multiply. It's Style #1. I love this waistband treatment - it's just 1" wide non-roll elastic turned to the inside. They have an invisible zipper and an inside button tab. It's so comfortable to wear. I designed a much skinnier leg style than what is shown in Pants that Mix n Multiply, but that's just a matter of narrowing the leg (and we have a free video showing how to do this. Just go to www.SFDLearningCenter.com to the Video Library - look in the Pants Videos for P.6.11 - How to Narrow the Pant Leg).
After narrowing the leg, I added short vents at the hem. For any really skinny pants, they help to get the hem opening over your ankle.
Those of you ladies who are attending the upcoming September Fit & Sew Retreat will see me wearing these pants...oh what to wear on top? When I bought this pants fabric, I chose a complimentary royal blue knit for a wrap crossover top.
So far, that's as far as I've gotten - draping it on the mannequin. When I was going through my fabric stash (for something else), I came upon a soft yellow knit that I'd originally used for the Waterfall Jacket. The soft yellow was just perfect to compliment the bright yellow in the pants. And since I didn't have time to sew the blue top too, I chose to use a tried and true pattern - my Center Front Gathered Tank Top.
25 years ago Glenda brought Sure-Fit Designs to the UK while attending a Stitchery Exhibition in Harrogate, England. Sure-Fit Designs once again is going to be present at arguably the biggest show of the year for the UK, the Great British Sewing Bee Live exhibition at London Excel.
Judith Johnson (our SFD UK/Ireland distributor) and I thought it would be a nice change from the usual sewing related blog to discuss the preparations for this grand exhibition including how she has made her online web store and Learning Centre into a physical store at the stand (booth).
Judith offers the following: I first heard about the Great British Sewing Bee Live in February this year. With the exhibition date being in September, I thought we would have plenty of time to prepare for the show. But as is often the case, time has passed very quickly.
The SFD Operations HQ (my home) and Planning Committee my daughter Heather (who assists with the website, presentations and other technical needs) my husband, Mark (the handyman), and myself would not have imagined the amount of planning that would be involved in creating a 4 day ‘store’ at the show. Nevertheless, it has been an extremely enjoyable experience.
The first decision to be made was the size and style of stand to choose and its position in the exhibition. We opted for a stand that is open on two sides as this would give greater visibility of demonstrations to the public. I discuss this next.
As always, we aim to promote learning at any opportunity. The Learning Centre at http://www.sfdlearningcenter.com provides many videos and articles to help with pattern fitting and drafting and we wanted to take some aspect of this Learning Centre to the show.
This meant that any stand had to accommodate a training area. This area will have a table, chairs, and tools for a practical designing exercise where anyone can sit and have a go at. One practical designing exercise that ladies will be able to sit and do, is how to move the bust dart from one location to another.
We will also give regular demos of how to use the Kits and Master Patterns. But even choosing the right table, white with rounded corners, for the stand has taken many web searches and discussions. Most tables were either too long or too wide. But through steadfast searching, we now have delivered to HQ: 1 table and 1000 bodice prints (we're expecting a lot of ladies to stop by to experience how to move a dart from one location to another - I'll teach you how).
Next delivery - 3 large heavy boxes of Sally Silhouette Notepads.
Whilst talking of designing, we thought a few Sally Silhouette Pads may be popular addition to the Combo packs and here Heather took the Silhouette from Glenda’s site to create a batch of designing pads.
Probably the greatest logistical challenge was getting sufficient Sure-Fit Designs stock and supplies here, in time, and in manageable quantities. Cue Glenda and Wes. Every month since February they have been packing and shipping large heavy boxes of stock via FedEx over to the UK. No sooner did they send one shipment than they were preparing for the next whilst still supporting their own sales and those of the other 3 international distributors. And just when they thought they had sent the last one, I asked for two more. My thanks go to Glenda, Wes and Kelly for their help and support with this task.
HQ now becoming more like a Storage Centre...even the delivery men are beginning to comment.
Then, out of the blue I receive an email from McCall's pattern company to ask if I wanted to supply up to 4 garments for the Cat Walk Fashion Show. Well, panic a little I did. I never hide from the fact that I am a novice seamstress. I love fitting and designing with Sure-Fit Designs but my standard of sewing is not up to Cat Walk level.
Those of you familiar with Sure-Fit Designs will know that to make clothes that fit properly we use personal measurements including shoulder length, shoulder to apex and shoulder to waist. We also use full bust measurements. So you can imagine my frustration when the only information the organisers of the Cat Walk show could give me was that the models were 5’ 10” tall, 34” B cup bust, 25” waist and 35” hip. How do you make anything that you will be confident will fit?
To the rescue came Glenda offering me the loan of garments from her display wardrobe. We just had one hurdle to cross. Glenda is not 5ft 10”! So after a lot of discussion we went with garments that are reasonably flexible for the height of the model.
I made a cap sleeve dress, in a jersey (to provide some ‘give’) and a little longer in the waist than my mannequin. My theory being that a cap sleeve does not require the shoulder length to be accurate, moving the bust dart into a cowl neckline meant the positioning of the bust dart to apex was not important. But shoulder to waist length is still a worry for me because I wanted to keep the waist shaping so that it didn’t look too baggy.
As time progressed, we needed to think of other aspects of the website that we had to convert to a physical form. For instance, how to show someone the contents of each ‘Combo’. Combo is the word we use to refer to a set combination of products that are grouped together and offered with a discount. For instance, the Dress Kit Combo and the Works Combo Plus.
We couldn’t display all the products in each of the Combo combinations that we offer as we don’t have the space but equally it isn’t practical to use the web. People don’t visit a show to look at the web.
Well, Heather’s IT skills were used once again. We discussed printing the Combo pictures, lists of what each Combo contains and laminating them. Then, when looking at the printing options we found we could easily produce a spiral-bound book on beautiful paper, with cover and backing and we added to it the Combo Comparison Chart. The link to this video shows you the lovely book that visitors will be able to look at. Here's the video - If you can't see this very short video in your email, please click on this link - https://youtu.be/XjEzsMLVUus
Then came the challenge of stock storage and counter. With a stand that is only 4 metres by 2 metres that also had to accommodate the table referred to above, the specification of this was important. It has to accommodate kits and long tracing vellum tubes as well as a computer to display a loop of the Sure-Fit videos (created by Heather). It also has to be able to be dismantled and put together again easily. Mark is very practical and has created the storage/counter that we will use at the show. This has a tall cupboard for the tracing vellum as well as accessible drawers for the kits.
We are all so excited to be representing
Sure-Fit Designs at this show and look forward to meeting our lovely customers,
both existing and new, that will be there. If you are
going to the show please come and see us on Stand G7.You will be able to meet Heather and me
everyday and my other daughter Charlotte on the Saturday of the show.You will know who is who by the name badges
that Heather created.
So, having sent the garments off to McCall’s, all that is left is to get a few posters
designed and printed (Heather again) and then start the mass packing of boxes and equipment to take down to the show the day
before it opens. Oh no, there is another challenge….. how to get it all in the
cars…..
If you just happen to be in London on one of the exhibition days, make sure you come by Stand G7, say hello and see the results of our physical Sure-Fit Designs store...Judith.
From Glenda the Good Stitch: I must say I am more than impressed with the enormous effort that Judith has gone to for this Sewing Bee Exhibition. No doubt theirs will be one of the more popular stands. You'll see Sure-Fit Designs in action, have an opportunity to sit and learn a practical experience of moving a dart from one location to another, and you'll be given the BEST customer care and service.
Saying 'thank you', to Judith, Heather and Mark doesn't begin to express how appreciative Wes and I are for your effort in representing Sure-Fit Designs so professionally in this upcoming Sewing Bee Exhibition.


 9. It's all about the Handle: The Line Drafter features a permanently attached handle making maneuverability fast and easy on both vertical and horizontal surfaces! The handle depth is ideal for a woman's hand to get a solid grip, and yet deep enough for a man's (larger) hand. And...it's not obtrusive or too large so that it doesn't obscure the ruler markings.