The most up-to-date introductory DVD on how to draw off your Sure-Fit Designs patterns is now on sale. If you don't yet have the latest SFD How-To DVD (new as of 2015), now is your opportunity.
It's regularly $29.95. Currently it's on Sale for 20% off. Sale price is $23.95 (+ S&H) and will be until Aug. 23, 2015.
Some women experience horizontal fullness or bagging directly beneath their tummy and just before the crotch curve begins. Once you've sewn your test muslin for your pants, if this is occurring, you will find one suggestion for a minor tune-up on page 12 (#1) of the Pants Kit Instruction Book. This may be a satisfactory refinement for you.
Another alternative is to remove this fold of fabric at CF. Follow these directions:
1. To determine how much you need to remove, pinch out the fabric in a tiny fold. If you pinch out 1/4" (.6cm), this will mean that you will be totally removing 1/2" (1.3cm).
Close-Up of dart/tuck wedge from CF going to nothing at the side seams.
2. Mark this level location of CF of the crotch seam. Draw a perpendicular line (to the grainline) over to the side seam. Mark point A and B.
3. Cut from CF to side seam, leaving a small hinge of paper at the side seam. This will act as a pivot point. Secure the pivot point with plastic tape.
4. Overlap the CF seam the amount you require, thereby crating a small horizontal dart or tuck which begins at CF and goes to nothing at the side seam.
5. True the CF crotch seam.
6. The more you overlap at CF, the more the waist edge tilts down and angles the CF seam. To maintain the original orientation of the upper CF seam, when you true the crotch seam, you will be crating a narrow wedge as indicated by the green arrow. (The blue line indicates where CF at the waist edge originated).
7. Cut/remove this narrow wedge and tape it back in place at the side seam waist edge. This will maintain the correct waist circumference and true the side seam shape so that it will sew in the same curve to the back side seam.
8. Redraw and reposition the front hip-fitting dart to best suit your body contours.
9. Bring the straight of grain up from the leg.
This process will shorten the CF crotch length by the amount of the dart/tuck. Be aware that you may need to add this amount on to the back crotch length so that you maintain your overall crotch length requirement.
Do you have asymmetrical body issues? Very few people are truly perfect and symmetrical from one side to the other of their bodies. Often a leg is slightly longer, or a shoulder might be sloped more than the other.
Ask yourself these questions:
1. How severe is the asymmetry?
2. Does it affect the look of my clothes on my body?
3. Should I make the effort to change my pattern?
If there are just slight differences from one side to the other, generally we do nothing, as it's simply not enough difference to affect the hang of the garment on our body.
However, if your garments hang crooked or form obvious drag lines toward the high or low point, then you will likely want to make asymmetrical adjustments to your pattern.
This typically entails creating a right and left side pattern that reflect the height and width dimensions for that part of your body. Once the change is done for both sides (if necessary), they will generally then need to meet in the middle - typically CF and/or CB. Once you've created a right and left side for your pattern and you're happy with the muslin test fitting shell, then you can use this pattern for future style changes.
You will always need to mark which is right and left side, and which side is going to be cut 'right side up'. It's definitely more effort, but well worth it when your clothes hang better on your body.
In some instances, like a high/low shoulder, sometimes you can get away with a temporary solution of adding a shoulder pad to the low side. This then will give you a more balanced look, particularly in jacket construction, and offers and easy solution. Always try to evaluate your options before doing major pattern adjustments.
You will find asymmetrical high/low hip adjustment directions on page 17 of the Dress Kit Instruction Book. The same basic concept applies to the waist line level of your pants pattern. If you'd like to see a short video regarding the asymmetrical hip heights, watch this video:
Often times, you will also need to make circumference tune-ups as well since one side can be wider as well as longer. Then you definitely need to create a right and left side pattern - for both the front and back of your skirt or pants.
Here's and example of pants that are now hanging fairly well on a definite asymmetrical body. The waist line is substantially tipped forward and the right buttock is definitely higher and fuller than the left. With persistence, and the creation of right and left side patterns for both front and back, these pants are now hanging smoothly.
Here are the happy customer's comments:
I finally have a great fitting pair of pants, thanks to the Sure-Fit Design system and the incredible assistance I received from Glenda. In my opinion, she is the star of the system! My original draft was easy to develop and certainly fit me better than any " straight from the envelope" pattern I've ever tried. But my "great fit" is entirely the result of endless patience and guidance from Glenda, addressing my severely tilted waist, uneven hips and various other figure issues. Over the course of about three weeks, we exchanged many emails working through all of the problems. Her service is exemplary, and I highly encourage anyone with problems fitting pants to give Sure-Fit Designs a try! KK, Sew Fittingly You, Victor, NY
As we age, many women develop a fuller tummy/stomach pouch. Sometimes this is primarily at CF and immediately underneath the waist. For other women, this rounding/fullness is not only under the waist, but it also spreads horizontally.
When you have this little belly/pouch, you will often experience fullness in the CF seam right underneath the pouch.
However, sometimes it fits just fine under the pouch, but you'll see drag lines/wrinkles pointing up toward the center of the tummy fullness. If this occurs, then consider this CF crotch seam refinement.
Rather than maintaining CF as a 'straight line', it can be slightly curved right where the tummy fullness is located.
The result is that:
1. You wouldn't be able to put in a zipper fly at CF - since you need a straight seam for this application. But a zipper front might not suit your body shape anyway because of the tummy pouch.
2. With a curved CF seam, you wouldn't want to sew with a stripe or checked fabric, as you'd end up with a 'chevron' effect at CF which likely wouldn't be that flattering. Choose solid colors.
This added curvature doesn't need to be a lot to make a substantial difference. So even though this refinement might sound a little strange, it really does work.
Here's a photo of a happy seamstress, as these are the best fitting pants she's ever worn. In this photo, her blouse is tucked in to show the excellent pattern fit, but typically she only ever wears her blouses out over top of her pants. This refinement really does work well!
As many of you know, from time to time, I send out 'thank you' gifts for you, my loyal subscribers. For one week, you can claim your new Fashion Leaflet 'the Princess Line Blouse' After July 21, 2015, there will be a nominal fee for this newest Fashion Leaflet.
So many of our SFD sewists ask for directions to make a basic blouse and how do you size up for just a little more wearing ease from your finished bodice blueprint. These directions tie all the concepts together for you. Please enjoy!
Princess Line Blouse
You'll be using your Sure-Fit Designs Dress Kit bodice to design this great-fitting princess line blouse which can be worn open or closed. The blouse features:
shoulder princess line detail
'V'd Center Front
CF Placket/band
Collar & Stand
Shirttail style of hem
3/4 Length Sleeve
Inverted 'V'd Sleeve hem detail
It's yours free for a week - until July 21 - as another one of my gifts to you, my loyal customers, subscribers & followers.
Here's another short video tutorial...
If you'd like to see how to add a bust-fitting dart to a dartless bodice pattern, watch this short video for the step-by-step process. I show you how to do this using the SFD Shirt Kit pattern. As many of you know, it's our uni-sex Shirt Kit and will sew shirts for both women and men and therefore it doesn't start out with a bust dart. But some of you ladies with fuller bust lines. will always get a superior fit when you have some bust dart shaping.
Make sure to watch this short video to discover how to 'perfect' the dart extension point. There's a quick little secret showing how easy it is to take your one-dimensional pattern and fold the dart thereby creating a three-dimensional form.
The cut edge of the dart extension point will lay flat when it's sewn. It will be straight and exactly aligned with the side seam cut edge and it will sew perfectly together with the side seam of the back bodice. All of this means that you won't be pulling the dart extension to fit in with the back side seam, which ultimately means that you eliminate the possible fold under the dart which can be mistaken for a fitting issue. I know when you watch the video that my comments will all make sense.
Happy Sewing and Fitting
Glenda...the Good Stitch!
PS - I just learned how to share my YouTube postings directly into this blog after I've uploaded a video to my YouTube channel...how cool is that!
Some of you may remember Sara
Gray (www.sewtogether.net) indexed the entire SFD fitting system and resources about 2 years ago. And of course, when we released the 2015 versions of each of the kits and instruction books, I asked Sara if she would be able to update the Super Index for you.
Sara very recently, found time amongst her many other business projects to do this for all of you. She has once again used a spreadsheet (Excel), categorized,
labeled and numbered every little piece of information and the design instructions found within the new SFD kits and books. The front cover (Page 1) still looks similar, though one more useful EASE KEY has been added. All you need to do is click here - http://www.sfdlearningcenter.com/FreeStuff.html to obtain the latest version of the SFD Super Index. Just scroll down the page and you'll find both the 'old' as well as current Super Index. The original index has been left on the website for the benefit of all our customers prior to March 2015 when the latest editions were released.
Here's what the new looks like:
For those of you reading this blog for the first time,
who perhaps don't yet have this valuable SFD resource, this is just like
trying to find a recipe. You want Potato Salad - you go to the index
and look up 'Salads' then follow alphabetically until you get to the
'P's'. Your cook book either has a recipe for Potato Salad or not.
It's
basically the same with the SFD Super Index (Sara's great name). As an
example: if you want to design and sew Yoga pants, you go to the
general category 'Pants' then go alphabetically to 'Yoga'. the Index
tells you what resource to look in - in this case you'd go to the
designing book - Pants that Mix n Multiply page 14. If you want
information on adding pleats to a skirt, go to 'Skirts', then to
'Pleated' and you'll see all the options available.
So
here it is again and well worth your time to download this Index. This
really is a fabulous resource that is completely indexed and
categorized for your easy reference. There's a Color Key, Source Key, Info Key and now Ease Key, which Sara explains on page 1.
So if you haven't already downloaded your complimentary copy, just go to Free Stuff in the Learning Center
and scroll on down to get your Super Index. It will take the
guesswork out of trying to find something you may just be looking for.
As my way of thanking Sara for her much-appreciated effort, I'd like to let you know about her newest available sewing project - the Tablet Prop-or-Go Pack-Prop-Protect project, which I believe is now a Craftsy project. Please click here for the direct link to her Craftsy class.
P.S.
And while your at it, if you feel so inclined, take a moment to send
Sara an email thanking her for diligence in producing this index and in
sharing it with you. sara@sewtogether.net
May 31 - June 5 saw another successful Fit & Sew Retreat come and go. The 6 days absolutely flew by. A lot of fitting and sewing occurs. A lot of learning experiences transpire.
This time, ladies were mostly Oregonians from eastern and central Oregon, and one more from Wisconsin. All were a delight to have in class.
You may enjoy seeing a photo journey of their 6 days. Here are the highlights:
Come 4 o'clock on Friday afternoon, we were all pretty tired, but positive results were had by all.
Thanks once again for attending, ladies. It was a pleasure to have each and every one of you.
This topic of double darts at the pants waist edge is well worth repeating. I just had to show
you another example of how adding a second dart at the waist line of
your pants pattern can really improve the fit.
If you
go from a relatively small waist to quite full high hips, I highly
recommend adding a second dart to the waist edge of your pants pattern.
This lady attended one of my recent Fit & Sew Retreats.
She has a pretty dominant swayed, dipped center back (at the waist
edge), quite full low hip measurement and thin legs.
Here's the result:
She's
always had difficulty getting any pants (or skirt for that matter) to
fit. That's why she attended the Retreat.
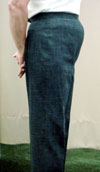
Keeping
in mind these are test pants, where every wrinkle and nuance shows, you're seeing a near to perfect fit at the waist and in the hips and a
beautiful hang on the leg. From a side view you're seeing a perfectly
straight side seam. CF needed to be raised slightly, but that was refined in the tune-ups.
In the above close-up, you're seeing the position of the 2 waist-fitting darts. They shape her hip shape well.
She did a great job of drafting her pattern and the results as so worth her effort. Well done...and great fit!
To see how to add this second waist-fitting dart, please watch this short video tutorial.
For any of you ladies who might fall into this category, you'll want to give this a try.