Oct 31, 2018

Men's Pants - We have a new Video Lesson series!

www.SureFitDesigns.com

Many of you have asked for the actual video directions for developing and drawing the Men's Pants pattern.  The good news is they're now available.  In these video lessons, you'll see lot of great close-ups which totally remove the guesswork when drawing both the men's pants back and front patterns.


These lessons are free for you if you already own the Men's Pants Instructional Package.  Those of you who bought this item individually or had it included with a Men's Combo or Works Combo, will have access to these video lessons totally free.  Simply contact your SFD distributor (see links below), provide proof of purchase or approximate date of purchase (so that we can cross-reference our files and your order), OR a photo of your Men's envelope, and the 100% Discount Code will be sent to you.

These lessons are now housed in our streaming video site: www.SewFitAcademyOnline.com.

To draw the men's pants pattern, you'll require both the ladies' Pants Kit and the Men's Pants Instructional Package.  If you already own the Men's Pants Package, contact your distributor to receive the 100% Discount Code giving you totally free access to these new video lessons. 

www.SewFitAcademyOnline.com


Don't let yourself get 'fit to be tied!'  Eliminate any frustration.  Just follow along with these new video lessons on drawing the men's pants.  If you already own the Men's Pants Package, contact your distributor to receive the 100% Discount Code giving your totally free access to these new video lessons.  Please provide proof of purchase or approximate date of purchase.

Your SFD Distributors:


USA: Contact: Glenda Sparling - info@surefitdesigns.com
South Africa - Contact: Elsabe Hurn - elsabe@surefitdesigns.co.za
UK/Ireland/EU - Contact: Judith Johnson - info@surefitdesigns.co.uk
Canada - Contact: Anna Espindola - anna@surefitdesigns.ca
Australia/NZ - Contact: Martha Schuster - martha@surefitdesigns.com.au

Enjoy!
Glenda the Good Stitch!
 

Oct 24, 2018

What to do if your pattern doesn't fit?

I don’t hear this comment very often, but when I get emails or phone calls and someone says ‘My pattern’s skin tight’ or ‘My pattern is too big’, it always is important to first check that you’ve drawn your pattern correctly.  And it’s not just drawing the pattern according to the simple SFD steps, but also that you’ve added seam allowances and cut and sewn the garment all accurately.
Here is a check list of variables that you need to check first because discrepancies with any of these can change the result of the final fit.  And if you prefer to watch the video where you can see what I'm talking about, just click on the forward arrow.  If you can't see the forward arrow - simply click this link - https://www.youtube.com/watch?v=KiRf2rkkafs


  1. Measuring.  Have you measured accurately?  Taking accurate measurements is always the underpinnings to getting a pattern fit to your body needs.
  2. Marking pattern dots.  Have you marked your appropriate measurement dots accurately?  Make sure to use a fine/medium tipped pencil when transferring the master pattern measurement dots on to your tracing vellum.
  3. Check drawn pattern widths.  Double check the widths of the resulting pattern before adding seam allowances.  Measure the pattern from stitching line to stitching line, adding any relevant segments together.  Make sure to account for the total circumference.  Compare the measurement that the pattern is giving to your actual measurement.  Remember that wearing ease is included in the master pattern.  Check the specific instruction book for ease in the pattern you are drawing.
  4. Accurate seam allowances.  Are the seam allowances 5/8” (1.6cm) wide?  With the Designing Stylus, use the edge of the seam allowance slot that is nearest the outside edge of the Stylus to draw the allowance.  Spot check for accuracy.
  5. Cut with care.  Whether using a rotary cutter or fabric shears, cut carefully maintaining the 5/8” (1.6cm) seam allowance.
  6. Stitch accurately.  Is the stitched seam allowance exactly 5/8” (1.6cm) wide?  If you need to, place a piece of visible tape on the throat plate 5/8” (1.6cm) away from the needle.
  7. Personal ease preferences.  Know how you like your clothes to fit.  The Dress Kit skirt pattern gives 3” (7.6cm) ease in the hip, while the pants pattern gives 2” (5.1cm) hip ease.  Some may find these ease allotments too little or too much.  It’s all a matter of personal preference.
When you change any of these variables, your resulting fit will naturally vary.  Please be aware of these aspects so that when you evaluate the fit of your test garment, these elements will no longer be causing any issues.
 
Also, please read out Customer Service Policy - CLICK HERE
 
Happy Fitting!
Glenda...the Good Stitch
 

Oct 16, 2018

Hmmm...What's a French Dart?

Sometimes seamstresses get confused about exactly what a French Dart is.  Research states it quite simply.  A regular dart is straight.  A French dart is slightly curved.  Also, a French dart usually begins near the waist line or a little above or below, but typically, it is a long, curved dart as shown in the following illustration.


In a past Fit & Sew Retreat, this student chose to change the bust-fitting dart into a French Dart for her Tank Top project.
You'll find complete directions for designing this French Dart on page 25 of the Dress Kit Instruction Book.

Notice that the bulk of the fabric for the folded part of the dart has been removed and that you end up with a cutting line that curves up toward the dart tip.

When stitching this dart, you may want to add a stay tape, like a narrow clear elastic/plastic tape, since you are stitching the bias of the fabric and this will prevent the dart from stretching out of shape as you sew.  Make sure to press this dart over a tailor's ham.  And if the fabric frays a lot, you can always serge/overlock the raw edge of the seam allowance.

Everything about this tank top fit so nicely when she was finished.  Well done!

Happy designing and sewing! 
Glenda the Good Stitch

Oct 11, 2018

Annual Tracing Vellum Sale

Buy One get One 1/2 Price!
It's that time of year again to stock up on this fabulous Tracing Vellum.  Those of you who have used it absolutely love it.

10, 20 & 50 yd Tracing Vellum
All 3 sizes on SALE!
(Sorry you can't mix sizes)
These are the lowest prices of the year so stock up now.
Offer good until midnight Sunday Oct. 14, 2018

CLICK HERE for the Tracing Vellum sale.


 OR

 OR


The Sure-Fit Designs Tracing Vellum is:
**see-through
**strong
**durable
**can be used as a Press Cloth
**And...it's totally erasable


Try it...you'll love it!


CLICK HERE for the Tracing Vellum sale.

Offer good until midnight Sunday Oct. 14, 2018 


Happy pattern drafting!
Glenda the Good Stitch

Oct 2, 2018

Baggies under the Butt - How to fix

Upper thigh Dart/Wedge: A Way to Help Remove Under-the-Butt Wrinkles

If you have baggies under your backside, there are a number of alternatives for removing them.  This accompanying photo is a little on the grainy side (sorry) but it does show you what this situation might look like.

Horizontal Upper Thigh Dart/Wedge

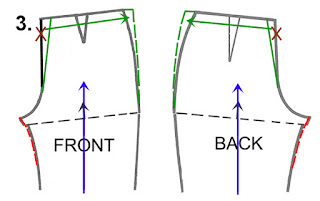
This refinement may help your situation.  Pinch out an pin a dart/wedge from the upper, inner thigh on both front and back going to nothing at the side seam.  You have to do this on front and back so that the inseams remain the same length.

Try the pants on.  If this helps, then baste this dart in place and try them on once more.  If you're satisfied with the result, then follow these instructions to make this change on your pants blueprint.
1.  Draw a line perpendicular to the straight of grain from the inseam to the side seam.
2.  Cut from the inseam to the side seam, leaving a paper hinge at the side seam.  Overlap to remove the width of the dart/wedge.

True the inseam.

Redraw the straight of grain from the leg upward.


3.  Even though this process does not change the length of CF or CB crotch curves, it does tilt them.  If you do this on a grid/grain board, you will be able to determine the amount of the tilt.
Cut this amount off CB and add it back on to side back.  Do the same for CF.
This will straighten the CF, CB and side seams to their original positions.
Revised Muslin Test
Needless to say you will need to sew a test with these changes incorporated.  You may need to adjust the direction of the darts as well as evaluate how the waist edge is now sitting on your body.
Alternative Tune-Ups 
For other tune-up alternatives, see:
1.  Pants Kit Instruction Book - page 15#11
Happy Sewing,
Glenda...the Good Stitch!