Showing posts with label Dress/bodice designing. Show all posts

Dec 4, 2018

Know your Resources from Sure-Fit Designs

www.surefitdesigns.com

We love making new videos for your continued education and learning experiences with Sure-Fit Designs.

The 2 latest ones are just perfect for our new members wondering where to start with the Sure-Fit Designs fitting and sewing system.  First I address the multitude of resources that Sure-Fit Designs offers to help you on your way to successful fitting of your body shape - titled Sloper and Blueprints from Sure-Fit Designs.

Since the videos may not open up from the actual video link provided below, I'll also give the direct link to the YouTube video for your viewing convenience.

Click here if you can't view the video directly below -
https://youtu.be/WoYWdiwVcms


In this next video I discuss moving beyond your bodice blueprint with the analysis of a few blouse examples to examine the design lines showing you how easy it is to go beyond your sloper - bodice blueprint - to create a few simple, attractive garments that you'd be proud to wear.  This video is titled - Designing with the Dress Kit Sloper - Blouse Examples.

 Click here if you can't view the video directly below -
https://youtu.be/wRHrdst6fVM


We're on a roll!  We're replacing some of the very old videos along with adding new ones to the Learning Center for your benefit and experience (https://www.sfdlearningcenter.com/Video_Library.html).  We currently have over 200+ free educational videos (on YouTube and in the SFD Learning Center), however, if you have suggestions for new topics, we are always open to suggestions and your input...in fact we love receiving your suggestions.  Please send requests directly to Glenda the Good Stitch at info@surefitdesigns.com.

Happy Fitting & Sewing,
Glenda the Good Stitch


Nov 21, 2017

Peplum Anyone?

www.surefitdesigns.blogspot.com

I recently wore this blouse with peplum in the November Fit & Sew Retreat.  All the students loved it and so I thought I'd share it with you.

With the dominant pattern, it's a little difficult to see, but it buttons up to the waist level, then releases into the peplum feature.  The bust dart has been transferred up to the shoulder line and then stitched in a release pleat.  You'll find direction to transfer the bust dart on pages 24 & 25 of the Sure-Fit Designs Dress Kit Instruction book.  The 3/4 length sleeve has a little fullness at the hem level and is finished with a narrow band.

The back bodice is pretty simple.  I left the waist-fitting darts out - meaning they are there in the pattern, but not sewn.  The resulting dart width space gave a little bit of fullness/gathering before attaching the peplum.  I also added a narrow bow tie that is inserted into the side seam and then tied at center back.  This is not a feature I'd normally wear, but it worked well with the peplum feature.

The Peplum instructions are found on the 4-pg Fashion Design Sheet that you see in the above photo.
The other designs given in those instructions include garment shirring, inset godets, asymmetrical yoke designing and a tulip-flipped flounce skirt.  You can order the download version of the Fashion Design Sheet from this page.  These digital Fashion Leaflets and other Digital E-goods are also available from the SFD international distributors.


Ah...the neckline...it's the S-Curved neckline that I've used on a couple of blouses.  It's got a feminine curve to it which is drawn by using the mini-Stylus...the Designer's Companion drawing tool.  The directions for this feminine neckline style are found on page 54 of the Dress Kit Instruction Book.


Have fun designing and sewing!
Glenda the Good Stitch

Nov 7, 2017

Look What Your Body Blueprint Can Do!

www.surefitdesigns.com

You've drawn your body blueprint (your sloper) from your Sure-Fit Designs Dress Kit bodice - now let's take a look at 3 common designs easily drawn from your finished blueprint.

First of all, your bodice blueprint is represented in the shaded gray(ish) color.


An easy design to draw is the Vest - shaded in pink.  You'll find Vest directions in both the Sure-Fit Designs Shirt Kit (on the enclosed Fashion Leaflet), and in the Children's Kit on page 33.  The directions for an adult vest are basically the same, except you'll have your bust dart on the side seam.


Your bodice blueprint can easily be drafted into a blouse.  Just make sure to add your skirt blueprint attached at the bodice waist level so that you make sure you incorporate your correct high and low hip circumferences, so that the blouse will button up comfortably into your hip area.  There are directions for adding the skirt to the bodice on page 32 of the Dress Kit instruction book.  And there are a couple of free videos on blouse designing.  Simply go to http://www.sfdlearningcenter.com/VideoCategory-DressKit.html and look for D.20 Designing a Blouse, D.27 Blouse Designing 101, and D.32 How to Draw & Designs the Kimberly Blouse.


Next you'll see the shaded green area which represents a general outline for a basic jacket.  By raising and extending the shoulder point (for a shoulder pad) and widening the underarm to allow for jacket-wearing ease, you can sew jackets from your Dress Kit bodice blueprint.  See page 35 in the Dress Kit instruction book for specific Jacket/Coat Designing ease changes.

Happy fitting & designing!
Glenda...the Good Stitch

Aug 22, 2017

New Fashion Leaflet

www.surefitdesigns.com

So many of you love the wrap front crossover style of blouse.  Last week, I gave you information on how to remove the gap that just might happen on your diagonal crossover.  As I explained, this is due to the crossover being on the bias and a bias cut typically will stretch and will often result in a gaping front overlap.  If this is your first time reading on this topic, you may want to look back to last week's post.

Today I'm announcing the newest digital Fashion Leaflet - the Wrap Crossover: Sleeveless Surplice Top.
This particular top is sewn with a very limited stretch knit fabric - meaning I did not size down my bodice blueprint.  But I did use the series of underarm dots for Sleeveless Garments so that the underarm would pull up and in toward my body.  Just remember, the stretchier your fabric, the more you will want to size down to accommodate the stretch of the fabric. You'll find information on sizing down for stretchy fabrics on page 6 of your Dress Kit instruction book.  If you want to sew this from a woven fabric, just think ahead and plan for a center back zipper.


This digital Fashion Leaflet can be purchased from this page - http://surefitdesigns.homestead.com/DigitalE-Goods.html
Cost? = $4.49

Happy Sewing!
 

Jul 25, 2017

Animal Print Slinky

www.surefitdesigns.blogspot.com
Last week I talked about working with slinky and some of the challenges you'll encounter as well as ways to best deal with the fabric.  Here's a cute outfit where the skirt is designed and sewn with a 'slinky' type of fabric.  The top is sewn from a very stretchy 2-way knit jersey, though it isn't slinky.


The hem of the skirt is simply finished as a rolled hem sewn on the serger with wooly nylon.  Sorry it's hard to see up close when it's been stitched in black thread.  The waist edge is pull-on and has been finished with 1" wide elastic. Directions to design and sew this style of waist edge are found in the Pants Kit Instruction Book on page 24.


For the top, I used my Dress Kit bodice blueprint, though I'd previously removed the dart for a T-Shirt type of style.  Since I'm so small busted I can get away without having the dart.  For these directions, go to this article - http://www.sfdlearningcenter.com/T-Shirt-Tactics.html.


Here's a close-up of the sleeve detail.  This is a 3/4 length sleeve and I added shirring at the middle of the sleeve near the hem level.


Shirring instructions can be found in the designing book Sew Sensational Shirts.

The top features a V-Neck embellished with strips of the animal print criss-crossing the V-neck opening.


This criss-crossing process went like this.
1. Copy both sides of the V-neck shape on tracing vellum.

2.  Then draw where you want your strips to criss-cross.  I've highlighted the approximate positions in pink and yellow highlighter tape.

3.  Prepare the strips.  I interfaced directly down the center.


4.  Then I stitched and turned the tubes/strips.


5.  Lay the strips criss-crossing one another using the drawing as a guide.


6. Hand or machine baste the strips at the cross points.

7. Staystitch the neck edge and clip to the V point.


8. Using the vellum diagram as a guide, place the strips to the neck edge.  Baste in place.


 Inside view


Right side view

9. Then finish off with the facing.  I cut a 2 part front facing (meaning there was a seam at CF) so that it would be easier to stitch up to the V.  It still wasn't that easy, but with persistence and fiddling, it all went together.

I'm sure there is likely an easier way to attach these strips to the front.  Perhaps someone who has previously sewn this type of insert would like to leave a comment as I'm sure it will be of benefit to all reading this blog.  I invite your comments and do appreciate them.

Happy Fitting & Sewing!

Jun 27, 2017

A shaped Back Shoulder Yoke

Vest Success continued...
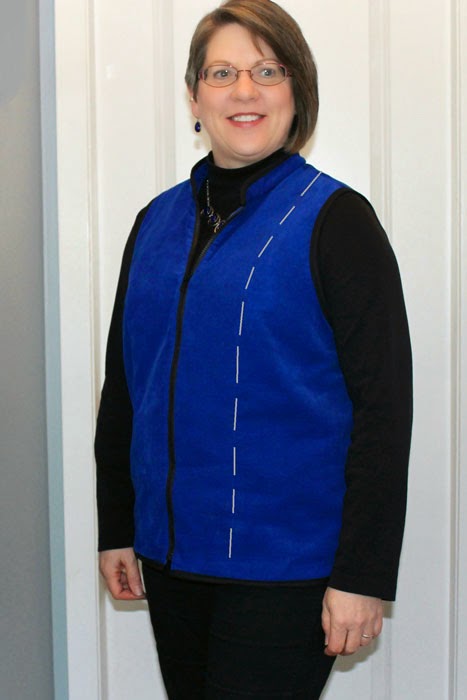
In case you are wondering what to do with your back shoulder dart (if you have one)...see how to transfer it into a back yoke.  One of our SFD ladies designed the Reversible Vest (a relatively new SFD downloadable Fashion Leaflet).  This particular lady had a back shoulder dart that she needed to deal with.  She needed the back shoulder dart for her slightly rounded shoulder blades, but didn't want the dart appearing in her vest.  When drawing the vest pattern, she simply transferred this dart into the armscye and the resulting slightly curved seam took care of the dart and she ended up with a yoke detail in the back of her vest.


Because her photos were somewhat dark, I simply outlined the stitching lines that she designed.  Now you can see where the back yoke is.

First, let's review how to add a back shoulder dart.
Step 1: Draw line A to B as illustrated.  This line should be at a level where the most rounding or protruding fullness is on your back/shoulder blades.  Then draw line C to D as shown.  This line does not have to be at a right angle to A-B, but the angle that you choose will affect the final position of the dart, therefore, it should be at a pleasing angle for your specific body shape.  You may need to sew a couple of tests to make sure you're pleased with the results.
Step 2: Cut from A to B and from C to D, leaving a paper hinge at the armscye point B and at point D on line A-B.
Step 3: Spread the shoulder area of the pattern open as shown always maintaining the paper hinge points.  This will open up a small dart shape in the shoulder seam line and will automatically lengthen CB.  Often people with rounded, protruding shoulder blades also have some rounding at the upper back and this extra length will help the bodice back to sit more comfortably.  Additionally, depending on how rounded your entire back is, you may also want to add a CB seam which is shaped/curved to suit your body contours.

Step 4: The more you open/lengthen CB that results in a wider dart, the more the upper and lower center back line becomes 'jogged'.  To maintain CB on the fold of the fabric, simply draw/true a new CB from the back neck point to the waist point.  Also re-establish a parallel straight of grain marking.  Depending on how accurately you measured your CB waist length and where this length is actually needed, you may now need to shorten CB at the waist edge and gently true from CB to the side seam.
Step 5:  This technique for adding a shoulder dart shouldn't distort the armscye significantly.  However, if the armscye appears to angled at the armscye hinge pivot point, make sure to blend/true to create a smooth curve.
This is what it looks like in 'real life'.

Now, on to changing this back shoulder dart into a back shoulder yoke that is slightly curved.  It really is a simple process.  Please watch this video to see how to accomplish this technique.

Just click on the forward arrow to begin play.  It's a short video and a simple process.  I know you'll find it easy to do.

Kindly,
Glenda...the Good Stitch!


May 16, 2017

Customer Appreciation Gift - Nautical Flare Sew Along

www.surefitdesigns.com

Many of you already know that periodically I extend to you Customer Appreciation Gifts.  Since we now have a new streaming video platform for our Sure-Fit Designs DVD tutorials and Sew Alongs, we thought this next gift should be a Sew Along.

Since we just went on a cruise and I made this top as part of my trip attire, I called it the Nautical Flare Sew Along.

It is designed from your Sure-Fit Designs Dress Kit and is sewn with a comfy knit fabric.  I did not size down even though it is sewn with a knit.  Perhaps this is because the neck and shoulder seams were stabilized with stay tape.  So not too much of it really stretches. And where the yoke joins the body of the garment, it has been top-stitched with the cover stitch machine (you definitely can make do with regular top-stitching if you don't own a cover stitch machine).  The remainder of the body flares and drapes at the hem level.

It's great worn with cropped legged pants, leggings or skinny jeans - take your pick.  It's just super comfortable.  I know yours will be too.

Including today, Tuesday May 16, and until mid-night Thursday May 18, 2017, for 3 days this is my gift to you, our very much appreciated and valued customer.  Simply go to www.sewfitacademyonline.com - choose the Nautical Flare Sew Along - proceed as if you were to purchase this Sew Along - then just before checkout, enter the coupon code NF3FREE.


PS - We had 7 glorious days of blue skies and sunshine...very much needed after our worst rainy winter in 97 years!!

Have fun with your Nautical Flare!

Kindly,
Glenda the Good Stitch!

Mar 21, 2017

Pleated Sleeve Detail

You remember this blouse that I'm wearing in the new Darts DVD - Versatile & Amazing? 


I've had many lovely comments about this blouse and some of you wondering exactly what I did to design the pleated sleeve.

I know you'll love it as it's so simple to add the pleat detail.   Use your sleeve pattern for woven fabric which has the elbow dart.  I left the elbow dart where it was.  If you wanted to, you could transfer it down to the hem line and 'remove' it...I chose to leave it in place.  If you're sewing with a knit fabric, then of course you'd use the sleeve pattern for knit/stretch fabric.

Here's what I did to the pattern.
1. Split it from the cap notch down through the hem level.
2. Spread the opening 2" (5cm).
3. Folded it as an inverted pleat - meaning each side of the pleat ends up being 1/2" (1.3cm) wide.

4. I stitched the inside/center of the fold down about 1" (2.5cm) down from the cap stitching line.  From the hem edge up, I stitched the inside/center of the fold up about 2" (5cm), so that when the hem was turned up inside the pleat would be secure.


5. Then I added a decorative (non-functioning) button to finish the hem off.

For the back of the blouse, I also added the same width for a center back inverted pleat and I shaped the hem to be just a little longer in the back.


I hope you enjoy designing and sewing this fashion blouse from your Sure-Fit Designs Dress Kit.  It's all pretty simple when your bodice blueprint (sloper) fits just you.

Happy Sewing!