Showing posts with label How-To. Show all posts

Jun 27, 2017

A shaped Back Shoulder Yoke

Vest Success continued...
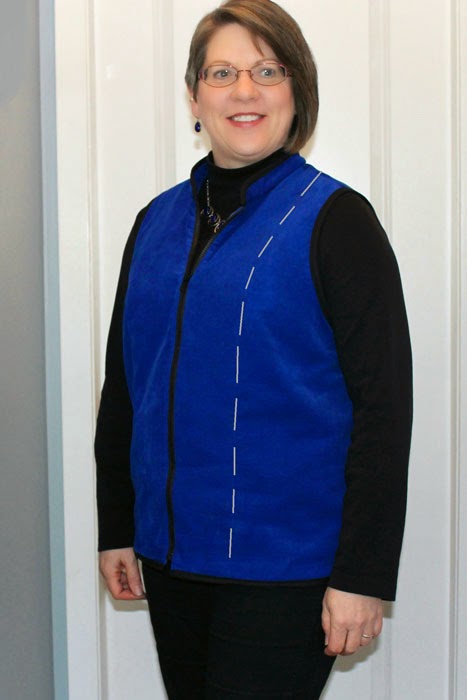
In case you are wondering what to do with your back shoulder dart (if you have one)...see how to transfer it into a back yoke.  One of our SFD ladies designed the Reversible Vest (a relatively new SFD downloadable Fashion Leaflet).  This particular lady had a back shoulder dart that she needed to deal with.  She needed the back shoulder dart for her slightly rounded shoulder blades, but didn't want the dart appearing in her vest.  When drawing the vest pattern, she simply transferred this dart into the armscye and the resulting slightly curved seam took care of the dart and she ended up with a yoke detail in the back of her vest.


Because her photos were somewhat dark, I simply outlined the stitching lines that she designed.  Now you can see where the back yoke is.

First, let's review how to add a back shoulder dart.
Step 1: Draw line A to B as illustrated.  This line should be at a level where the most rounding or protruding fullness is on your back/shoulder blades.  Then draw line C to D as shown.  This line does not have to be at a right angle to A-B, but the angle that you choose will affect the final position of the dart, therefore, it should be at a pleasing angle for your specific body shape.  You may need to sew a couple of tests to make sure you're pleased with the results.
Step 2: Cut from A to B and from C to D, leaving a paper hinge at the armscye point B and at point D on line A-B.
Step 3: Spread the shoulder area of the pattern open as shown always maintaining the paper hinge points.  This will open up a small dart shape in the shoulder seam line and will automatically lengthen CB.  Often people with rounded, protruding shoulder blades also have some rounding at the upper back and this extra length will help the bodice back to sit more comfortably.  Additionally, depending on how rounded your entire back is, you may also want to add a CB seam which is shaped/curved to suit your body contours.

Step 4: The more you open/lengthen CB that results in a wider dart, the more the upper and lower center back line becomes 'jogged'.  To maintain CB on the fold of the fabric, simply draw/true a new CB from the back neck point to the waist point.  Also re-establish a parallel straight of grain marking.  Depending on how accurately you measured your CB waist length and where this length is actually needed, you may now need to shorten CB at the waist edge and gently true from CB to the side seam.
Step 5:  This technique for adding a shoulder dart shouldn't distort the armscye significantly.  However, if the armscye appears to angled at the armscye hinge pivot point, make sure to blend/true to create a smooth curve.
This is what it looks like in 'real life'.

Now, on to changing this back shoulder dart into a back shoulder yoke that is slightly curved.  It really is a simple process.  Please watch this video to see how to accomplish this technique.

Just click on the forward arrow to begin play.  It's a short video and a simple process.  I know you'll find it easy to do.

Kindly,
Glenda...the Good Stitch!


May 17, 2016

Sway Back: Identification & Refinements for the Sway Back

Do I have a sway back?  Maybe, maybe not.  Other fitting issues can become confused with a true sway back.  Perhaps this blog will help you to identify what is happening for you.

1.  Prominent buttocks or dominant high hips - If your blouse circumference below your waist is not sufficient to circumvent your high hips or buttocks, the fabric will ride up, pulling from where it can, mainly from the larger, lower circumference. This pushes fabric up at the back waist.  The garment needs to be wider at the hip level thereby letting the fabric hang on your hips without pushing up. By attaching your SFD skirt pattern (knowing it fits your waist, high hip and low hip circumference) to your bodice waist edge, you know that the blouse, dress or jacket will hang smoothly around your waist and hips.

2.  A prominent bust - If you don't have a large/wide enough dart shape or you've not measured enough length from mid-shoulder over your apex to your waist level, the fabric will pull up at the front waist and cause telltale drag lines toward the back waist.  Make sure you've drawn the correct dart shape.  Go up a dart size/width if needed.  And/or re-measure shoulder over your apex to your identified waist level.

3.  Looseness across the back waistline - This can be due to being narrow across your back from side seam to side seam at your waist level.  Make sure you haven't measured your waist too loosely.  The back waist-fitting dart that aims toward your shoulder blades can be shaped in a curve to help shape and sculpt the bodice, the dart tip can be lengthened toward the shoulder blades and you can consider stitching the side seams with a slight curve. 


 4.  A short or generally high waist level - Make sure to evaluate and eliminate the above fit issues before assuming a sway back issue.  Note the illustration to the left showing a normal back compared to a sway back.  Posture can also contribute to the sway of your back.


And, a sway back can co-exist in conjunction with one of the above mentioned issues.

If you do have a sway back you may need to shorten the center back of the bodice but the one alternative is to add a CB seam and actually shape the seam to your swayed back.  Yes...stitch the seam in a slight curve that will shape the fabric to your body.  You will likely be shortening CB as well, but the curved seam is by far a major par to the solution.


To test how much you need to shorten CB,  pin a horizontal tuck about 3" up from the waistline, tapering to nothing at the side seams.  The total width of that tuck will indicate how much you need to shorten CB.  This will be taken off CB at the waist line and blended down toward the existing side seam waist point. 

Make sure that at CB you maintain a right angle (90 degree) from CB ou about 3/4" - 1" (1.7  - 2.5cm) and then begin your taper. 

You will likely have to re-draw the back waist fitting dart to maintain its accurate waist width.  The side seam would remain unchanged.  


Here's a couple of videos showing you this process if you'd prefer to watch:


Happy Sewing,
Glenda...the Good Stitch!

Jan 12, 2016

Demystifying Sewing Construction Steps

What fun...drawing your own patterns, particularly when you know they're going to fit...but how are you going to sew it all together? I am often asked if the Sure-Fit Designs fitting system provides sewing construction steps.  The answer is that some designs and leaflets have sewing steps, but not all of them do particularly when the construction is really simple.
When you're a beginner, often times, nothing is simple until you've sewn the process a number of times and become familiar with it.  And then as with anything you've learned, it becomes second nature.
In this blog, I'd like to share with you the generally accepted and established order of constructing a garment.  The steps make perfect sense.  You work with a flat pattern piece as long as you can until you have to sew an adjoining piece to it.  The fewer steps the better when it becomes a 3-dimensional shape.
And. after 50-plus years of sewing (like I've had), I rarely think of the process anymore unless it's a complicated design.  Then I begin at the beginning and think my way through the steps before I ever take the pieces to the sewing machine.
But when you're just starting out, it's important to understand that there is an established order to sewing any garment. The steps listed here are the industry standards. Use the list to refer to as often as needed, and soon, you'll find that it will be second nature to you.

1.  Darts, tucks and pleats.  Do these first and don't forget to press!

2.  Style lines like yokes and Princess lines. This does not include seam lines like shoulders, side seams or armholes.

3. Interfacing. Attach (either sew-on or iron-on) to any pieces that require it.

4.  Pockets. Apply them where indicated on the pattern.

5.  Zippers. Install any zippers required unless it is for a dress.

6.  Shoulder seams. 
 7.   Side seams, inseams, crotch seams.

8.  Prep collar. Do not attach it to garment yet.

9.  Prep sleeves.  This entails sewing the sleeve seam as well as any plackets, cuffs or elastic to sleeves. Also any gathering lines done in a baste stitch would be done now.  Do not sew the sleeve into the garment yet.

10.  Collars. Now is when you attach a collar to the garment.

11.  Bodice facings. Sew facing pieces together.

12.  Sleeves. Sew the sleeves into the armholes matching notches and remembering to gather the sleeve cap if needed.

13.  Bodice to skirt (if sewing a dress).

14.  Waistband. Or a waist facing or elastic if this is what your pattern requires.

15.  Dress zipper. 

16.  Hem.


17.  Buttons and buttonholes. Any closure such as hooks and eyes, frogs,snaps and belts should be done now.


Stay tuned next week for the list of SFD sewing patterns that do provide sewing guidelines and steps.


"The more you sew, the more your confidence grows." - Glenda the Good Stitch

(With thanks to Connie Crawford, The Industry Gide to Sewing Order.)

Jan 4, 2016

Circle Skirts

I've been asked by a few customers to give a tutorial on the circular skirt.  And so I'm going to share with you an excellent tutorial by Rhonda Buss of Rhonda's Creative Life.  I simply can't see any point in recreating the wheel when this tutorial is so complete.

First, let's take a look at the differences between the full circle skirt through to the 1/4 circle skirt, which is sourced from Claire at www.sew-incidentally.com.
This is such an excellent visual comparison of the results.


Now to get on with the tutorial, hop on over to Circle Skirt Tutorial by Rhonda Buss. 

Happy Sewing!

Oct 6, 2015

Sleeve Pitch: Increasing the Sleeve Pitch

As you read in last week's blog - Sleeves and all their Quirkiness - the Sure-Fit Designs Sleeve pattern is designed for ease of use, both in drawing and in construction, meaning the hem level is straight with a 1" (2.5cm) wide fold-up hem. A you increase the forward pitch, the hem will/should change to a gradual curve.  Additionally, the front underarm seam will bend to follow the forward hang of your arm.

Directions:

1.  Trace a copy of your SFD sleeve                    
pattern WITHOUT seam allowances or
hem allowance.  Label as shown: A - B -
C - D - E - F - G - H. (Point F & I will be
established during the drawing).


2. Extend the grainline down to the hem level, point A.


  3.  Draw a line from point A to B. 


4.  Cut from point A to B, and from C to B.  Leave a tiny paper hinge at point B - the pivot point.

5.  Pivot section A-B-C-D toward the middle of the sleeve.  Point D will move 'inward' 1/2" (1.3cm).  This is easiest done on a grain/grid board as shown.  Tape to secure.


6.  Since 1/2" (1.3cm) was taken away from the hem width on the back underarm seam, you need to add this amount 1/2" (1.3cm) to the right of point E on the front underarm seam.  Label as point F.  This maintains the same wrist circumference opening to pull the sleeve over your hand.

7.  Connect point F to G.  Point G should be smoothed slightly.  Measure both the front and back underarm seam lengths - minus the dart space on the back seam.  Underarm seams need to be the same length or a tiny bit shorter in the front (which would be eased into the back seam).  Adjust the length of the front underarm seam if necessary.


8.  F to G to H is the front underarm seam.  You may want to curve/bend this seam further.  It will depend on if you have enough elbow circumference ease for your particular arm shape.  If you'd like to shape this seam, mark 1/2" (1.3cm) toward the left of point G.  Label as point I.  Connect F to I to H.  Use the Designing Stylus to blend/shape the curve at this bend in the seam.  Now that you have substantially changed the length and shape of the front underarm seam, compare to the length of the back underarm seam - minus the dart space.  Lengthen or shorten at the hem level as needed.


 9.  The elbow dart has become slightly                            
wider.  Simply back the opening with tracing vellum. Tape securely.  Re-establish the center fold line of the dart and the new dart side seam cutting lines.


10.  At the wrist/hem level, connect point D to F in a slightly curved line.  The Designing Stylus is a great tool to draw this transition.


11.  Lastly, add 5/8" (1.6cm) seam allowances to all edges.  Because the wrist/hem level is now curved, you can't use a fold up hem allowance.  This edge will require a shaped facing.

Sew a trial sleeve to test this pattern shape on your arm. Depending on the shape and hang of your arm, you may need to further increase the forward pitch and/or change the shape of the front underarm seam.


Happy Sewing,


Aug 18, 2015

SFD Introductory How-To DVD-on sale for a limited time

The most up-to-date introductory DVD on how to draw off your Sure-Fit Designs patterns is now on sale.  If you don't yet have the latest SFD How-To DVD (new as of 2015), now is your opportunity.

It's regularly $29.95.  Currently it's on Sale for 20% off.  Sale price is $23.95 (+ S&H) and will be until Aug. 23, 2015.

Click Here to order.


What you'll get:

  • 2 DVD's ~ 4 hr. of video instruction
  • How to take accurate measurements for pants, bodice, skirt, the uni-sex Shirt Kit, Children's patterns & Men's Pants.
  • Filmed in HD for clarity
  • Close-ups for detail
  • See how to design for dresses/blouses/skirts/pants & shirts
  • Beginner to advanced will benefit with this DVD tutorial

Save 20% - Click Here to order.

For a brief video overview of this How-To DVD, watch this short overview.

Enjoy!
Glenda...the Good Stitch
 

Mar 31, 2015

Zipper Scratchies!

Protect yourself from those darn 'zipper scratchies'!

Sometimes when wearing a garment with an invisible zipper, the end of it - where the zipper stops - can be rough and scratchy.  Here's a quick tip on how to cover that end before you insert the zipper.

1. Use a soft, yet dense enough strip of fabric like cotton interlock.  Cut the strip 1" (2.5 cm) by about 2 1/4" (5.8 cm) wide.
2.  Lay this strip on the right side of the zipper tape with the cut edge almost on the end of the zipper.  Stitch directly beneath the zipper stop across the width of the zipper.

 3.  Trim some of the strip to remove excess bulk.

 4.  Fold the fabric strip around to the wrong side of the zipper wrapping/enclosing the ends of the zipper tape.

5.  Then from the right side, stitch in the ditch, sewing through all layers to secure it in position.


6.  Proceed with the normal application instructions to insert an invisible zipper.

...And on the inside, it looks like this...

This soft, little piece of fabric protects you from the 'zipper scratchies'.  It's a quick little technique.  Give it a try the next time you apply an invisible zipper.

Kindly,
Glenda...the Good Stitch!


Feb 3, 2015

A BIG Thank you!

  What's in the blog?

1. A big, big thank you!
2. Narrowing the Pants Leg
3. Your favorite sewing notion

A Great Big Thanks

Glenda the Good Stitch is saying many, many thanks to all of you who took the time to complete the survey questions from last week.  Wow!  Did you ever provide lots of food for thought and great topics for the Good Stitch to discuss in the coming weeks and months.

I generally don't repeat blog information very often, but we've had an influx of new SFD followers, and obviously they don't all know what you might know.

Narrowing the Pants Leg

One respondent asked about the leg width of the SFD Pants pattern.  She said that due to her larger hip circumference, when the pants pattern was said and done, she felt the leg width was too wide.  Even though the leg width doesn't grade out as wide as was needed for the hip circumference, for her height, she wanted the leg narrower.  Personal preference comes into play her, as some ladies might say the leg width was just fine.

So here's a video showing you how to narrow the leg.  It's very simple to do as long as you keep the amount removed basically the same on the inseam and side seam.


I often get asked how long the pant length should be.  First, it all depends on the height of heel you'll be wearing with that particular style of pants.  Generally, the higher the heel height the longer the pant length. 

In addition to heel height, you also need to think about hem circumference.  Here's a little rule of thumb for the length and circumference of the hem:  The skinnier/narrower the width of the pants leg (like in skinny jeans), the shorter the pant length should likely be.  The wider the circumference of the pant hem (as in flared leg pants), the longer the pant leg should likely be.

Once again, for those of you how are relatively new to Sure-Fit Designs and may not be aware of all the educational resources we offer, make sure you spend some time in the SFD Learning Center Video Library.


Your Most Favorite and Useful Sewing Notion??

And on a totally different topic, please use the comment box below to tell me the most important (sewing) notion you'd simply never want to be without when garment sewing.

Thanks so much,
Glenda...the Good Stitch!


Jan 6, 2015

T-Shirt Tactics

Everybody loves to wear T-shirts.  For some they are a wardrobe staple - for others they are only occasional wear.  Whatever their place is in your clothing needs, you have choices within the Sure-Fit Designs fitting and designing system as to how you approach this style of garment.

Typically, the T-shirt is relatively close fitting and does not have a bust dart and is sewn from a knit fabric.  The no-bust dart feature does present a problem for you full-busted women.  You all know you will always achieve a superior fit when your pattern has a bust dart.

The Sure-Fit Designs pattern kits provide either the darted bodice pattern from the Dress Kit, or the undarted pattern from the Shirt Kit.  Most of you already know that the Dress Kit bodice has 2 1/2" (6.4 cm) ease in the bust circumference, whereas the Shirt Kit has 5-6" (12.7 - 15.2 cm) ease in the chest circumference.

Which kit to use for your T-shirt?   Since the T-Shirt is usually undarted with a closer fit to the body, you'd use the Dress Kit bodice (with the bust dart).  If you use the Shirt Kit, you'll have a looser fit and a much deeper armscye.

Ah Ha!  In comes my new article, T-Shirt Tactics, where I offer an alternative which uses the Dress Kit bodice and I show you how to remove the dart!  The result offers a fit that is closer to your body, the armscye is not as deep as with the Shirt Kit, and this process generally provides an excellent T-shirt alternative.

Yes I know it doesn't have a bust dart anymore, so you full-busted ladies will inevitably end up with some folding in the armscye that points toward your bust.  And no doubt, the shirt will likely hike up somewhat in the front because your don't have that bust dart shaping your bustline.  But since you are going to be sewing with a forgiving knit fabric, usually these issues are minimized.  But at least, you have 3 great choices now to design your favorite T-shirt with the Sure-Fit Designs patterns.
  • Dress Kit bodice with dart
  • Shirt Kit pattern - no dart - deeper armscye
  • Dress Kit bodice without dart
To download your copy of the T-Shirt Tactics article with instructions to remove the dart, please Click Here, then simply scroll toward the middle of the page where you'll see the link for the .pdf file.
Just for fun and for interest, I finished my T-shirt with a self-fabric 2 1/2" wide band at the hem level, scooped the neck edge 2" all the way around and then filled in with a 1 1/2" self-fabric band.  A small tab was inserted at CF while applying the neck band and finished with a decorative button.

And another great benefit is that it can be 'Made in a Day'!  It's just one more quick project for you.

Give it a try and send me your comments and photos.  When you send your photos, I'll put together a T-Shirt collage...and show off all of your work.  Please send photos to info@surefitdesigns.com.
Enjoy,
Glenda...the Good Stitch!

Dec 2, 2014

Small Waist to Full High Hip

I know I covered this topic a few months ago, but I just had to show you another example of how adding a second dart at the waist line of your pants pattern can really improve the fit.

If you go from a relatively small waist to quite full high hips, I highly recommend adding a second dart to the waist edge of your pants pattern.

This lady attended one of my recent Fit & Sew Retreats.  She has a pretty dominant swayed, dipped center back (at the waist edge), and a small waist in relation to high hips that become quite full about 2 1/2" (6.4 cm) down from her waist level.  She is so curvy from waist to high hip, that I recommended she add a second dart at the waist edge of her pants patterns.

Here's the result:


She's always had difficulty getting any pants (or skirt for that matter) to fit in the high hip without being excessively big in the waist.

Keeping in mind these are test pants that are pinned closed, you're seeing a near to perfect crotch, perfect fit at the waist and in the hips and a beautiful hang on the leg.  From a side view you're seeing a perfectly straight side seam.


In the above close-up, you're seeing the position of the 2 waist-fitting darts.  They shape her hip shape beautifully.

She did a great job of drafting her pattern and the results as so worth her effort.  Well done...and great fit!

To see how to add this second waist-fitting dart, please watch this short video tutorial.


For any of you ladies who might fall into this category, you'll want to give this a try.

Kindly,
Glenda...the Good Stitch!