Feb 4, 2014

Lining Know - How

I'm sure you've often wondered whether to line a garment or not. Yes, it does take extra time, effort and cost, but usually the instances when you'd line a garment are well worth the extra investment. Here are a few pointers, facts and details - what lining is, why to use it and some fabric choices.

Basically, a lining is a replica of a garment that is attached to the inside of the garment at various points. It is an inner garment made of thin, silky fabric that is sewn on the inside of the fashion garment.

The following are excellent reasons why you'd line a garment.
It is used to cover internal constructions details.
Lining makes garments hang better, fit smoothly and hang more comfortably.
Lining a garment makes it easier to put on and take off.
Lining is often a hallmark of quality clothing.
A lining will conceal the raw edges of a garment and prevent fraying.
Lining provides a beautiful finish to armholes and neck edges.
It provides warmth.
It replaces the need for a slip.

Silk-type fabrics are often used for the lining fabric, however, there are many choices available. A general rule is that the lining fabric should never be heavier than the garment fabric. It is also wise to choose an anti-static fabric to avoid static cling in the finished project.

Typically the lining is cut the same dimensions as the fashion fabric, though if you want prevent some of the stress on the outer fabric, the lengthwise seams of the lining can be sewn just slightly wider than those of the fashion fabric. When wearing, the stress on the fabric will then be on the lining, not on the fashion fabric. Also, you'll want to shorten the hem of the lining about 1/2" to 1" shorter than the fashion fabric.

Some fabric choices for linings are:
Silk Crêpe de Chine - softly textured, available in a variety weights, provides excellent drape, does not fray.
Acetate Satin - beautiful drape and sheen, easy to take on and off, no static
Polyester Habotai (also know as China silk) - economical, durable, drapes well, wrinkle and stain resistant.
Though linings are often the same or similar color tones to the fashion fabric, you can also choose more bold colors or attractive prints.


There is a difference between lining and underlining. Underlining is a second layer of fabric cut from the pattern and sewn as one piece with the fashion fabric. It is used to add weight, firmness and stability to the fashion fabric.

As an alternative to lining, underlining backs the fashion fabric and is attached by hand or machine basting wrong side to wrong side of each garment piece before sewing the garment together. Then the underlining and the fashion fabric are treated as one piece.

This method does not conceal the raw edges, which must still be finished.
It does, however, reduce clinging, stretching and wrinkling.
It provides firmness to the outer garment and can reduce the buildup of static electricity in some fabrics.

Underlinings may also be referred to as Mounting.

Some fabric choices for underlinings are:
Cotton Voile - sheer and thin, provides stability for light to medium weight silk, absorbent
Rayon Challis - soft and light, adds depth but not bulk to garments
Cotton Flannel - provides warmth and absorbency, lightly napped surface


And then there's interlining. This is a term used for a layer that sits between the fashion fabric and the lining fabric. Batting or wool would be a good example for interlining.

Jan 28, 2014

Cowl Collection

Everybody's loved the cowl neck blouse designs in Beyond Bodice Basics.  For those of you who have this Dress Kit designing book but haven't undertaken a project yet, let me inspire you with these cowl neck blouses.

This is Style 3, Variation #1
Let's just call this one the regular 'vanilla version'.

One of my Fit & Sew Retreat students, Kathleen, chose to draw this pattern as her bodice project during the workshop.  At first she said that she was a little intimidated by the instructions, but once she got into drawing the pattern, she realized that the instructions were very clear and logical.  It all came together just like it was supposed to.  Here's what Kathleen's pattern looked like.

 And here's a happy student in her finished blouse.   A drapy, soft knit is a good choice for this pattern design.

And from Kentucky, we also have Cowl Neck blouses contributed by some of the members of the ASG Fit & Style group.
Shelby Smarte chose to design and sew a sleeveless version. Nicely done, Shelby.


From Kathy Wille, we see her lovely finished blouse.  Looks fabulous.  I bet it looks even better on you, Kathy!

Cowl necks - different body shapes...all look lovely.  Thanks for the group photo ladies!

Another Kentucky contribution from Marilyn Neel in her summery sleeveless cowl neck dress that she called 'Summer Breezes'.  She loved it so much, Marilyn sewed the same dress with 3/4 sleeves, which she called 'Shades of Autumn'.  That's gorgeous fabric in both dresses, Marilyn!


This is Style 3, Variation #2
This particular design variation features curved shoulder detailing. It's based on the same drawing technique for the drapy cowl front, but before you begin the neckline drape, you cut away the curved shoulder shape.


And this last photo contribution is from Gudrun K. from Germany.  She's sewn a coordinating outfit of pants and blouse.  Good job with the shoulder detailing!

Thank you, ladies for sharing your work.  If any more of you have sewn the cowl neck blouse and would like to send a photo, I'd love to see your accomplishments.  You likely know the address: info@surefitdesigns.com.

And for those of you who need a more 'visual' nudge, remember that your Beyond Bodice Basics designing book comes with its own how-to DVD.  You be able to see exactly how these cowl neck designs are drawn from your basic Dress Kit bodice.

Jan 21, 2014

SFD Super Index by Sara

Way back when in the fall of 2013 - (doesn't that just seem like ages ago?) - in one of the SFD newsletters, I let all of you know that Sara Gray (www.sewtogether.net) indexed the entire SFD fitting system and resources.  Bless her heart...she felt she couldn't go ahead with her first muslin test until she knew where everything was located in all the SFD books, kits and leaflets.

Years ago we used to have an SFD Easy Find Index, but when we updated and digitized everything in 2010, that index was no longer relevant.  Sara set about indexing the entire SFD fitting system for herself.  She used a spreadsheet (Excel), categorized, labeled and numbered every little piece of information and design aspect of SFD where it was located and what kind of information you'd see if you went to that particular page/book.  And when she was done, she offered it to me to share with all of you!  Of course I proofed it to make sure everything was in it's proper home, but the bulk of the work is all thanks to Sara.

Here's what it looks like:
The reason I'm bringing the Super Index to your attention once more, is that recently a customer told me she didn't understand the index, what it was about, how to use it etc.  So for those of you reading this blog, who perhaps don't yet have this valuable resource, this is just like trying to find a recipe.  You want Potato Salad - you go to the index and look up 'Salads' then follow alphabetically until you get to the 'P's'.  Your cook book either has a recipe for Potato Salad or not.

It's basically the same with the SFD Super Index (Sara's great name).  As an example: if you want to design and sew Yoga pants, you go to the general category 'Pants' then go alphabetically to 'Yoga'.  the Index tells you what resource to look in - in this case you'd go to the designing book - Pants that Mix n Multiply page 14.  If you want information on adding pleats to a skirt, go to 'Skirts', then to 'Pleated' and you'll see all the options available.

Another reason I'm bringing this up is because when we introduced the new Collar Collection and 5th Edition Dress Kit Instruction book (Jan 1, 2014) Sara was willing to modify the Super Index to reflect the new designs and page changes.

So here it is again and well worth your time to download this Index.  This really is a fabulous resource that is completely indexed and categorized for your easy reference.  There's a Color Key, Source Key and Info Key, which Sara explains on page 1.

So if you haven't already downloaded your complimentary copy, just go to Free Stuff in the Learning Center and click on through to get your Super Index.  It will take the guesswork out of trying to find something you may just be looking for.

P.S.  And while your at it, if you feel so inclined, take a moment to send Sara an email thanking her for diligence in producing this index and in sharing it with you. sara@sewtogether.net

Kindly,
Glenda

Jan 14, 2014

Radiant Orchid - Is it Hot?

Pantone Color 18-3224 may not mean much to some of you.  All you want to know is that this is supposed to be the hot 'It' color for 2014.  It's kind of a pinky purple known as 'radiant orchid'.   According to Pantone, the company that claims global authority on color trends, recently revealed radiant orchid as a captivating, magical and enigmatic purple.

Pantone says radiant orchid's multifaceted hue is "seductive" when combined with red and it pairs well with its "sister shades" of lavender, purple and pink. It also can be paired with olive and hunter greens, turquoise and teal, light yellows, gray, beige and taupe, the company says.

Leatrice Eiseman, executive director of the Pantone Color Institute, in a news release said, "it's an enchanting harmony of fuchsia, purple and pink undertones, radiant orchid inspires confidence and emanates great joy, love and health.  It is a captivating purple, one that draw you in with its beguiling charm."
Photos by Contributed Photo/Chattanooga Times Free Press 

 Photo by C.B. Schmelter
And you can expect to see it used for clothing to make-up to appliances.  Maybe you'll even see it on someone's hair, but not mine!
Pantone, which is in the business of selling color, gives advice to industries from clothing companies to cars and home decor.  They watch the runways at Prada, Chanel and Dior and many of the spring collections featured an abundance of pinks and purples.
And though there might not be an 'It' hem length anymore, they say there is definitely an 'It' color and as Neiman Marcus says, 'It's this pink'.  Sephora (the make-up, skin care company) says the color is widely flattering.  It's vibrant and inviting yet has enough warm tones to look good on most skin types. Nail polish and lipstick are a natural. And it's already popping up in Converse and Nike's shoes.  On the runway, Cynthia Rowley was among many designers using the color in their spring collection.  No doubt we'll see it in our fabric choices.

Jan 7, 2014

Whew...It's all done! Let's Sew (easy) Collars!

'What's all done?' you ask.  The last 3 months of 2013 producing the Master Pattern Collar Collection, the Fifth Edition Dress Kit Instruction book, and a web site face-lift kept me off the streets and out of trouble!

First - the Master Pattern Collar Collection has been added to the Dress Kit master patterns.  Now it's very simple to draw collars for your bodice neckline.  This Collar Collection is now part of the Fifth Edition Dress Kit.  Side 1 gives you the collar shapes.  Side 2 gives you detailed instruction on how to use and draw your personal shape.


I know you're going to love working with these collar patterns.
Here's a short video introducing the collection.  
After you've watched the video, I encourage you to comment, 'like' and/or subscribe to the surefitdesigns YouTube channel.  You'll receive immediate notification when a new video is published.  Also, please share this with your sewing buddies on your FaceBook page, sewing blog or forum.  One of my 2014 goals is to increase our SFD subscribers so I'm asking for your help to  'spread the word'.


Second - the Dress Kit Instruction book has been expanded from 48 to 52 pages.  The Fifth edition now has new designs and instructions for the set-in cap sleeve, the two-part sleeve (used primarily in tailored jackets), the funnel neckline design and a really pretty and comfortable high/low hemmed swing top...along with other instruction updates and clarifications.

To see a quick video explaining the Fifth Edition Dress Instruction book, watch below.  (Sorry...the video is not embedded in this blog.  For some strange reason this blogger software can't find the video, even though it is definitely on YouTube.  So the next best thing is to click on this link and watch it on the web page.  http://www.surefitdesigns.com/WhatsNew.html


If you would like to add either (or both) the Collar Collection or Fifth Edition Dress Kit Instruction book to your SFD kits and supplies, please just click here.  http://www.surefitdesigns.com/WhatsNew.html

Third - and last but not least, the main surefitdesigns.com website has undergone a face lift!  The Home Page has been totally transformed to make it easier for you to get to where you want to go.  Now you'll see descriptive icons to take you to their respective pages.  You'll see images like the following:


I hope you find it easier to select what you're looking for.  Once you've taken a browse around SureFitDesigns.com, I would appreciate your comments and feedback.  We want this to be a better experience for you in obtaining the information and getting to where you want to go quickly.  Everyone has opinions about what they like and don't like, so please leave a comment on this blog - or if you can't get the comment box to work - just sent me an email to info@surefitdesigns.com.   I seriously want your feedback - all kudos and constructive criticisms regarding the website are welcome.
Kindly,
Glenda


Dec 30, 2013

Help me out - Your suggestions welcome! and...Happy New Year!

As we officially close 2013 and open up 2014, first, I'd like to wish you all a Happy New Year. 2013 has gone way too fast, but it's been a great year. 

Second, I'd like to request your suggestions.  You all know that we post lots of complimentary, tutorial-type of videos to help you with your fitting, designing and sewing success.  To date, Sure-Fit Designs now has over 120 instructional 'helps' up on You Tube.  We intend to keep that number growing throughout 2014.

During the past 3 months, we've knocked off a number of them that were on my 'Video To-Do List', so now I need your help and suggestions.  Usually, the tutorials stem from suggestions and requests you ask for, issues I see happening with our customers as they are drawing off their patterns and some of the topics come from what I see occurring in my fitting retreats.  When I see something happen more than 2 or 3 times, I figure there might be a few others out there that are experiencing the same issue.

What would you like to see explained or addressed in new videos?  Please take a few minutes to leave a comment on this blog page.  When you're commenting, please be specific.  Remember, I attempt to focus on only one single topic at a time and something that can be dealt with in no more than about 10 minutes of video time.  And...if you can't get the Comment Box on this blog page to work properly, simply drop me an email at info@surefitdesigns.com.

As you are contemplating your input, think of topics relating to drawing out your body blueprints, fitting and minor tune-ups and adjustments, designing questions and/or sewing issues you might want information on.


And before I close this very short, end-of-the-year blog, I must give credit to my ever-resourceful and creative husband (Wes), who, as many of you know is our videographer.

We've graduated from our humble beginnings of a friend's borrowed camera, to top-of-the-line movie production video cam and cameras, equipment, and complex editing software.  Everything now is shot in HD (and uploaded to YouTube in HD too), so that you receive the best clarity possible.

It's been a creative learning experience for both of us...we've loved the challenge...and there's more to come.

I really do want your input, so take a few minutes to offer your video topic suggestions.  And don't be afraid to offer more than one suggestion - I will appreciate and evaluate all of them.

Thank you all for a great 2013!  We wish you all the best in the coming year and may you have many hours of rewarding sewing.
Happy New Year,
Glenda

Dec 24, 2013

What's a French Dart?

Sometimes seamstresses get confused about exactly what a French Dart is.  Research states it quite simply.  A regular dart is straight.  A French dart is slightly curved.  Also, a French dart usually begins near the waist line or a little above or below, but typically, it is a long, curved dart as shown in the following illustration.

In a recent Fit & Sew Retreat, Lynda chose to change the bust-fitting dart into a French Dart for her Tank Top project.
You'll find complete directions for designing this French Dart on page 23 of the Dress Kit Instruction Book.

Notice that the bulk of the fabric for the folded part of the dart has been removed and that you end up with a cutting line that curves up toward the dart tip.

When stitching this dart, you may want to add a stay tape, like a narrow clear elastic/plastic tape, since you are stitching the bias of the fabric and this will prevent the dart from stretching out of shape as you sew.  Make sure to press this dart over a tailor's ham.  And if the fabric frays a lot, you can always serge/overlock the raw edge of the seam allowance.


Everything about this tank top fit so nicely when she was finished.  Well done, Lynda!


Dec 17, 2013

Clever Clover Clips

A lot of you likely already know about these Wonder Clips, but since I'm not a quilter, they were new to me.
They look like miniature clothes pegs - boy that sure dates us when we remember clothes pegs!

When I send out the Supply List for the SFD Fit & Sew Retreats, I always tell the ladies they can bring whatever sewing supplies they want...whatever makes them happy and comfortable.  Our Sewing Room - where I teach - comes equipped with most everything you could need (and we are welcome to use their supplies), but when ladies drive in, they often bring those little extras.  It's fun to see everyone's different sewing habits, and when Barbara started clipping her seams together (rather than pinning), a couple of us were intriqued.


 Here Barb has clipped her pants legs together in preparation for sewing.

And here she's used them to clip the sleeve into the bodice.  This sure saves getting stuck by pins.

If you're interested, you can find them at Nancy's Notions or at Amazon.  They're actually called 'Wonder Clips' and are manufactured by Clover.  They have a great holding capacity.  Each clip opens wide to hold layers of fabric and the clip's base is flat so it rides flat on the throat plate.  Each package contains 50 clips.  This would be a great stocking stuffer (when you're stuffing your own stocking - or if you get your request into the 'Stocking-Stuffer' elves ahead of time)!

It was great to have you in class Barbara...thanks for sharing.


Dec 10, 2013

Circle the Dots

Is this like circle the wagons?  Not really - just another helpful tip - contributed by Kathleen S. from Eugene, OR.

You all likely know by now that I always recommend drawing your personal patterns in pencil.  I know I use brightly colored pens in our SFD videos and DVD's, but that's only so that you can see what I'm doing.

I'm sure a lot of you know that when you are drawing with pencil, those gray, graphite dots kind of get lost on the vellum when your dot is directly on top of one of the Master Pattern dots.

Sure you can use erasable colored pencils, but in the recent October Fit & Sew Retreat, one of the ladies was drawing small circles around her dots.  I thought, 'what clever idea'!  Why hadn't I thought of that??

Well, thanks to Kathleen S. I'm now sharing this tiny little tidbit of info...just to make all your SFD experiences more positive.

So simple, yet so effective!  Thanks Katheen.

Dec 3, 2013

Princess-Seamed Pants

I still hear lots of ladies groan every time I suggest using a seam up the center of the pants leg.  For some reason or other, they must think there is some stigma attached to using a seam up the center of the leg of the pants pattern.

But when you have quite a flat backside, or when you have a large high hip or abdomenal circumference (meaning a large waist and stomach area) going to a flat backside or pencil thin legs, this center leg seam is truly a life-saver.  With this seam, you can deepen the stitching curve under your backside and you can use it to help taper the legs.  Those of you who have seen this process and the results being pants that fit so well, are true converts.

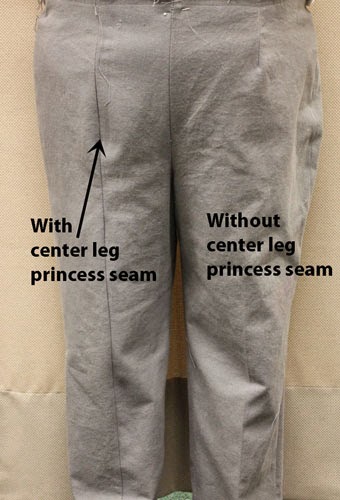
But have you thought of using this same seaming concept up the front of your pants leg?  In this photo, you'll see pants front - with one 'regular' leg and one 'seamed' leg.
Please keep in mind these are 'test' pants - hence all the other wrinkles - but you can likely see the remarkable difference between the leg with or without the center seam.  It simply fits so much better.

Here's the completed side and back views.

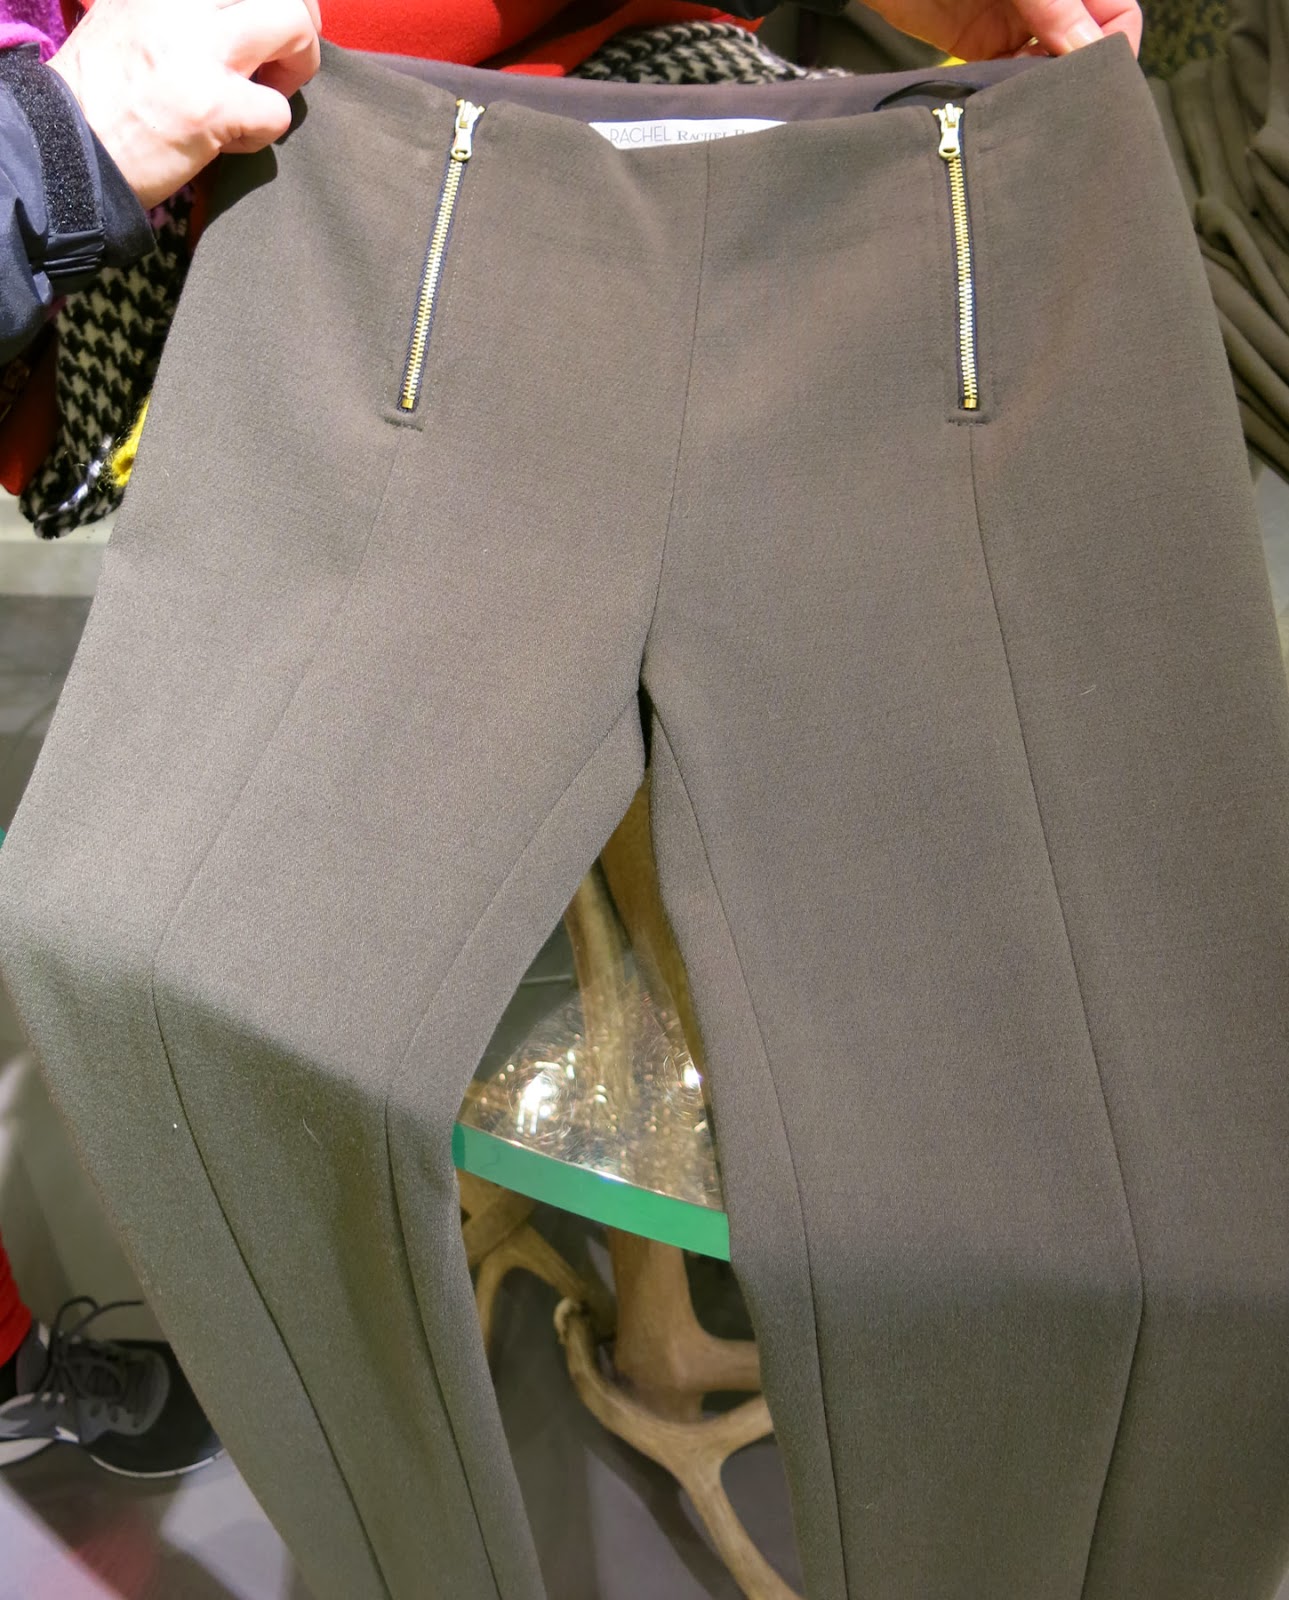
 Do you remember my NY trip blog?  Well, while 'shopping' those famous 5th. Ave stores, another design I saw LOTS of  was pants with seams - down the back and front of the pants leg.  Designer's simply know you can get a superior fit when you incorporate these leg seams for shaping.  Here's a photo of the front of a pair of pants (sorry I wasn't holding them totally upright), but you can still see the front leg seam.  By the way, these exposed zippers are very popular too.  (FYI - These pants were priced at $249.00).  How simple are these for us talented seamstresses!


Now, to make this happen, I suggest watching this video.  This concept of adding seams to the interior of both the front and back legs of your pants pattern is significant enough to have made a video on the process.  Please take a few minutes to watch.

(Well, this is crazy, but I'm having great difficulty accessing this video from YouTube and putting it in this blog.  So until I get that figured out, please just click on this link and it will take you directly to the video on the YouTube site.  It's called

Just give this a try to see how simple and effective the pants princess seam can be to help refine your pants fit.
Kindly,
Glenda