Mar 27, 2018

Unsure how to sew it all together? This Resource Guide is a Must!

www.surefitdesigns.com

When you’ve sewn for ages your mind kicks into gear when constructing a garment.  What do you do first?  What do you sew next?  You kind of know the order in which things should be done.  But for the novice, it might not be so obvious. Use these guidelines and you’ll generally be well on your way to a comfortable level of knowing how to sew something together.
First, do as much work on a major pattern piece as possible before joining them to another major piece.  All darts, pleats, tucks and style lines (like princess lines) would be sewn first.  Sew side seams and shoulder seams only when you can’t do anything more on the major piece.  This makes pressing easier, simplifies the sewing process, makes the garment easier to handle in the machine and the entire construction process will take less time.  
 

Read through these steps first, then analyze them in relation to the garment you want to sew.  Eliminate those that don’t apply, but stay with the general flow of steps.
  1. Attach any interfacing.  Whether for a blouse, dress, coat, shirt or waistband of pants or shirt, do this first.
  2. Darts, tucks, pleats.  Do these next.
  3. Sew style lines.  Does your pattern have style lines like princess lines or yokes?  Anything that is not a shoulder or side seam should be sewn now.
  4. Pockets.  Apply them to the major piece taking care that they are balanced from one side to the other.
  5. Insert the zipper.  If possible insert the zipper while the major piece is still flat, but if it is a dress with a waist seam and the zipper extends into the skirt, it will be applied later.
  6. Shoulder seams generally come next.
  7. Sew a 'shirt-style' sleeve.  The lower, flatter sleeve cap lends itself to sewing into the front and back armscye at this time.
  8. For shirts, sew side seams from hem up through underarm to sleeve hem edge.  For pants, sew inseams and side seams.  For a dress, if the design has an attached skirt, sew the skirt and bodice side seams separately, but don't attach skirt the skirt to the bodice yet.
  9. For pants, sew crotch seams.
  10. Sew waistband or facings for pants/skirts. Finish elastic waists at this time.
  11. Sew collar.  Prepare collar.  Make sure facings have been prepped.  Attach collar.
  12. Prepare sleeve.  Prepare any detailing like plackets, gathers, etc. before stitching the underarm seam.  Apply cuffs if applicable.
  13. Set in sleeve.
  14. Neckline/armhole facings.  Sew the neckline or armhole facings if there is no collar.
  15. Dress waist seam.  For 2-piece dresses, sew bodice to skirt at waistline.
  16. Apply zipper.  For dresses with waistline seams, add the zipper now.
  17. Finish hem.
  18. Closures.  Buttons, buttonholes, hooks and eyes, frog closures, snaps should be sewn at this time.
  19. Belts, bows or additional trimmings may happen now.
  20. Always Press As You Sew!
 
The more you sew, the more your confidence grows.

(Adapted from Industry Guide to Sewing Order by Connie Crawford)


(PS - Sometimes I really detest Blogger...I simply couldn't get the text and the images lined up where I wanted them to display...But I'm sure you'll get the picture.  LOL) 


Happy Sewing!
Glenda The Good Stitch
 

Mar 20, 2018

Garment Linings

www.surefitdesigns.com

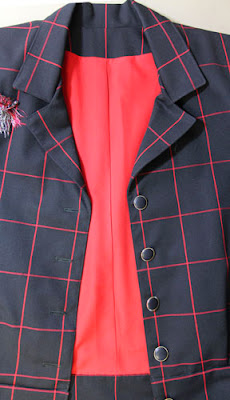
I'm sure you've often wondered whether to line a garment or not. Yes, it does take extra time, effort and cost, but usually the instances when you'd line a garment are well worth the extra investment. Here are a few pointers, facts and details - what lining is, why to use it and some fabric choices.

Basically, a lining is a replica of a garment that is attached to the inside of the garment at various points. It is an inner garment made of thin, silky fabric that is sewn on the inside of the fashion garment.

The following are excellent reasons why you'd line a garment.
It is used to cover internal constructions details.
Lining makes garments hang better, fit smoothly and hang more comfortably.
Lining a garment makes it easier to put on and take off.
Lining is often a hallmark of quality clothing.
A lining will conceal the raw edges of a garment and prevent fraying.
Lining provides a beautiful finish to armholes and neck edges.
It provides warmth.
It replaces the need for a slip.

Silk-type fabrics are often used for the lining fabric, however, there are many choices available. A general rule is that the lining fabric should never be heavier than the garment fabric. It is also wise to choose an anti-static fabric to avoid static cling in the finished project.

Typically the lining is cut the same dimensions as the fashion fabric, though if you want prevent some of the stress on the outer fabric, the lengthwise seams of the lining can be sewn just slightly wider than those of the fashion fabric. When wearing, the stress on the fabric will then be on the lining, not on the fashion fabric. Also, you'll want to shorten the hem of the lining about 1/2" to 1" shorter than the fashion fabric.

Some fabric choices for linings are:
Silk Crêpe de Chine - softly textured, available in a variety weights, provides excellent drape, does not fray.
Acetate Satin - beautiful drape and sheen, easy to take on and off, no static
Polyester Habotai (also know as China silk) - economical, durable, drapes well, wrinkle and stain resistant.
Though linings are often the same or similar color tones to the fashion fabric, you can also choose more bold colors or attractive prints.


There is a difference between lining and underlining. Underlining is a second layer of fabric cut from the pattern and sewn as one piece with the fashion fabric. It is used to add weight, firmness and stability to the fashion fabric.

As an alternative to lining, underlining backs the fashion fabric and is attached by hand or machine basting wrong side to wrong side of each garment piece before sewing the garment together. Then the underlining and the fashion fabric are treated as one piece.

This method does not conceal the raw edges, which must still be finished.
It does, however, reduce clinging, stretching and wrinkling.
It provides firmness to the outer garment and can reduce the buildup of static electricity in some fabrics.

Underlinings may also be referred to as Mounting.

Some fabric choices for underlinings are:
Cotton Voile - sheer and thin, provides stability for light to medium weight silk, absorbent
Rayon Challis - soft and light, adds depth but not bulk to garments
Cotton Flannel - provides warmth and absorbency, lightly napped surface 


And then there's interlining. This is a term used for a layer that sits between the fashion fabric and the lining fabric. Batting or wool would be a good example for interlining.

Happy Sewing!
Glenda the Good Stitch!
 

Mar 13, 2018

The Sheath Dress & Removing the Waist/Hip Darts

www.surefitdesigns.com

How simple it is to convert your Sure-Fit Designs dress blueprint from a woven sheath dress to sewing with a knit fabric for a similar style of dress.  If you want a simple sew and go dress, this would be it.

First, you need to take your skirt and bodice patterns, line them up together following the directions on page 32 of your Dress Kit Instruction book. If you'd like to see a short video showing you this process, please click on this link as the video may not show up in your email client.
https://youtu.be/9z6qN7cKjTw

Then, you'll subtract some of the waist/hip fitting darts at the side seam waist point.  But...each waist fitting dart is 1.5" wide.  In my estimation, that's a little too much to come of in one fell swoop on the side seam.  Even though you'll be sewing with a stretchy knit fabric, I suggest you start by initially removing half this amount or 3/4" from the side seam waist point.
And depending on how stretchy your knit fabric is, you may want to 'size down' all the circumference dots to remove some of the built-in wearing ease that is provided when sewing with your woven fabrics.  See page 6 of the Dress Kit Instruction book for the guidelines: 'Sewing with Knit/Stretchy Fabric'.


The back of the dress has the darts removed in a similar manner.  And if you've sized the front of the pattern down for sewing with your specific knit fabric, make sure you do this to the back as well.

 And if you have a back shoulder dart, you may or may not want to sew it in place...again, it depends on how stretchy the fabric is and how curved your shoulder blades and back is.  But if you choose to remove the dart, you can do so by taking off the dart equivalent right at the intersection of the shoulder line and armscye.
Now for a visual presentation of this entire process, make sure to watch this short video - it's the latest to be added to the Sure-Fit Designs YouTube channel as well as to the SFD Learning Center.

https://youtu.be/6TMAq4hlljY 

And...when you've got this 'sew and go' dress completed, make sure to send a photo or post your creation in our SFDChallenge2018.  Get your free SFD Challenge Planner by joining now at this link.

Happy Designing & Sewing!


Mar 6, 2018

Get Ready for the Long Tailed Big Shirt

www.surefitdesigns.com

Have you been wanting to add the Sure-Fit Designs Shirt Kit to your sewing patterns?  Now is the time to pick up the Shirt Kit while it's on SALE.


You'll want the Shirt Kit in preparation for the Long Tailed Big Shirt Sew Along which is coming next month.

Save 10% on the individual Shirt Kit - simply use Discount Code SHIRT10.
Or...save 5% on the already discounted Shirt Kit Combos - use Discount Code SHIRT5.

The already discounted combo choices are:The Mini Shirt Kit Combo
The bare minimum - the Mini Shirt Kit Combo contains:
*The Shirt Kit
*Introductory How-To DVD
*The Designing Stylus
Normally $77.95...
Now $74.05 - (with discount code Shirt5)
CLICK HERE
 

The Regular Shirt Kit Combo
The next level - the Regular Shirt Kit Combo contains:
*The Shirt Kit
*Introductory How-To DVD
*The Designing Stylus
*1x10yd Tracing Vellum
*Sew Sensational Shirts - Shirt designing book
Normally $110.95...
Now $105.40 - (with discount code Shirt5)
 

The Maxi Shirt Kit Combo 
The ultimate - the Maxi Shirt Kit Combo contains:
*The Shirt Kit
*Introductory How-To DVD
*The Designing Stylus
*1x10yd Tracing Vellum
*Sew Sensational Shirts - Shirt designing book
*Shirt Fitting Course DVD - in-depth Shirt pattern drawing, sewing & fitting.
Normally $154.90...
Now $147.15 - (with discount code Shirt5

This offer is good through Friday March 9, 2018.

Happy Fitting and Sewing!
Glenda the Good Stitch