May 17, 2016

Sway Back: Identification & Refinements for the Sway Back

Do I have a sway back?  Maybe, maybe not.  Other fitting issues can become confused with a true sway back.  Perhaps this blog will help you to identify what is happening for you.

1.  Prominent buttocks or dominant high hips - If your blouse circumference below your waist is not sufficient to circumvent your high hips or buttocks, the fabric will ride up, pulling from where it can, mainly from the larger, lower circumference. This pushes fabric up at the back waist.  The garment needs to be wider at the hip level thereby letting the fabric hang on your hips without pushing up. By attaching your SFD skirt pattern (knowing it fits your waist, high hip and low hip circumference) to your bodice waist edge, you know that the blouse, dress or jacket will hang smoothly around your waist and hips.

2.  A prominent bust - If you don't have a large/wide enough dart shape or you've not measured enough length from mid-shoulder over your apex to your waist level, the fabric will pull up at the front waist and cause telltale drag lines toward the back waist.  Make sure you've drawn the correct dart shape.  Go up a dart size/width if needed.  And/or re-measure shoulder over your apex to your identified waist level.

3.  Looseness across the back waistline - This can be due to being narrow across your back from side seam to side seam at your waist level.  Make sure you haven't measured your waist too loosely.  The back waist-fitting dart that aims toward your shoulder blades can be shaped in a curve to help shape and sculpt the bodice, the dart tip can be lengthened toward the shoulder blades and you can consider stitching the side seams with a slight curve. 


 4.  A short or generally high waist level - Make sure to evaluate and eliminate the above fit issues before assuming a sway back issue.  Note the illustration to the left showing a normal back compared to a sway back.  Posture can also contribute to the sway of your back.


And, a sway back can co-exist in conjunction with one of the above mentioned issues.

If you do have a sway back you may need to shorten the center back of the bodice but the one alternative is to add a CB seam and actually shape the seam to your swayed back.  Yes...stitch the seam in a slight curve that will shape the fabric to your body.  You will likely be shortening CB as well, but the curved seam is by far a major par to the solution.


To test how much you need to shorten CB,  pin a horizontal tuck about 3" up from the waistline, tapering to nothing at the side seams.  The total width of that tuck will indicate how much you need to shorten CB.  This will be taken off CB at the waist line and blended down toward the existing side seam waist point. 

Make sure that at CB you maintain a right angle (90 degree) from CB ou about 3/4" - 1" (1.7  - 2.5cm) and then begin your taper. 

You will likely have to re-draw the back waist fitting dart to maintain its accurate waist width.  The side seam would remain unchanged.  


Here's a couple of videos showing you this process if you'd prefer to watch:


Happy Sewing,
Glenda...the Good Stitch!

May 10, 2016

Bye, Bye Basic Black

I love my new leggings!

I've sewn them from something called Scuba fabric that I recently picked up at my local JoAnn Fabric store.  This was a Nicole Miller fabric designed exclusively for JoAnn Fabrics.

It's kind of a spongy dual-layer fabric with lots of lengthwise and crosswise stretch...just perfect for leggings...and everyone's wearing leggings this season, whether to the gym or for just simply daytime wear.  It's 57" wide fabric, 94% polyester and 6% Spandex.


The pattern for the leggings is from the Sure-Fit Designs (downloadable) Leggings Fashion Leaflet found on this page - Click Here.


One of the few differences from the above instructions is that I eliminated the side seam.  Once I'd sized down for the 'leggings' fit, front and back were laid together at the side seams, so that the front and back could be cut together as one unit.  The actual instructions for a 'No Side Seam Pants Style' are found in the Sure-Fit Designs Children's Kit.  And there is also a discussion of how to eliminate the side seam in the Pajama Pants video found in the Sure-Fit Designs Learning Center. Click Here.


Without the side seam, you now have only 3 easy seams: both inseams and the crotch curve.  But first I used my Cover stitch machine to stitch up the hem.  Here are photos of both right and wrong side at the hem.  If you'd like complimentary videos on stitching with a Cover Stitch machine, Click Here.


Once the hem was turned up and stitched, the inseams were sewn with a 4-thread serger process.  I also used a stretchy cone thread which was something new for me.  This thread is kind of spongy like Wooly Nylon, but not quite so springy.  I thought it would be a good thread complement to the stretchy fabric since I knew I'd wear them in my yoga class.

Then the crotch seam was sewn.

And lastly, I applied 1" (2.5 cm) wide elastic at the waist edge.  The elastic was cut 2" (5 cm) less than my waist measurement and sewn to the waist edge with zigzag stitching.   For directions for applying waist elastic with this technique, refer to page 24 of your Sure-Fit Designs Pants Kit Instruction Book (5th edition).  When on, they feel really comfortable.  When I first put them on the 'scuba' fabric feels a little 'cold', but within a short period of time, they warm up (maybe it's me that's warming up!  I'm always cold!).


Yes, they were fun to make and extremely quick to sew.  They definitely qualify as another 'Made in a Day' project.

Happy Sewing!

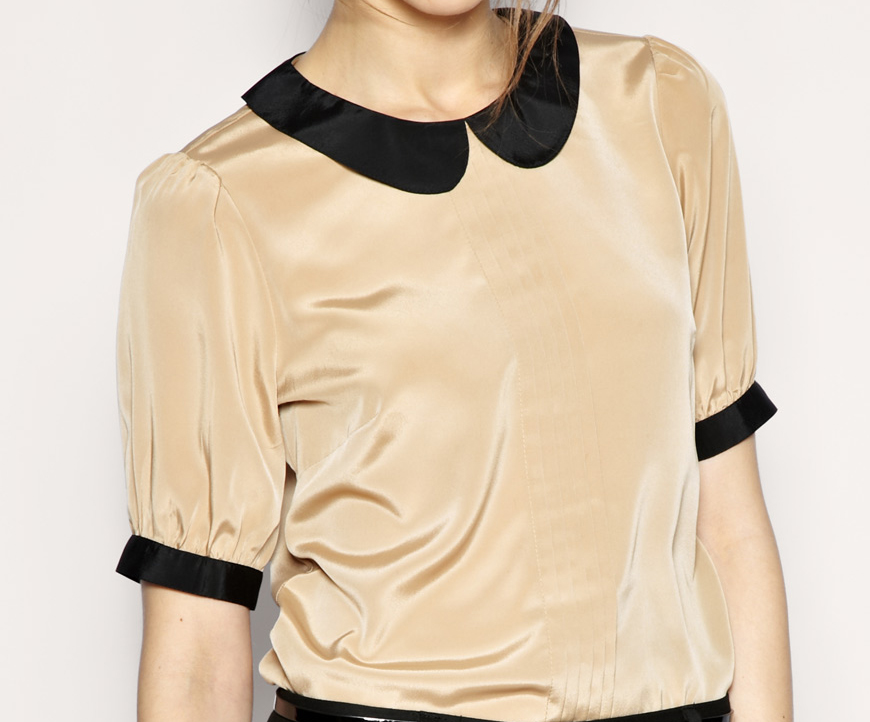
Peter Pan Collar Application

Collars are often a prominent focal point in a blouse, dress or jacket.  To avoid that 'home-made' look, there are some internal steps that should be completed to avoid curled edges and a collar, particularly a Peter Pan collar, that won't otherwise lay flat.  Cutting the upper collar a hair wider than the under collar, interfacing the under collar, clipping and notching the seams, all play an important roll in a professional result.


Step 1:
Staystitch neck edge of bodice before attaching collar.


Step 2:
Cut upper and under collar pieces.  The upper collar needs to be slightly larger (1/8") than the under collar to ensure that it rolls correctly.  Heavy fabric may need more than 1/8" ease.

Step 3:
Cut one pattern piece of iron on interfacing using the under collar pattern.  Do not include seam allowances on the interfacing.

Step 4:
Apply interfacing to the wrong side of the under collar.


Step 5:
Since the upper collar is slightly larger, pin upper collar to under collar, easing the upper collar slightly around the outer edge.  This will allow the upper collar piece to roll smoothly.

Step 6:
With right sides together, stitch upper collar to under collar leaving the inner neck edge open.  Stitch from center out to front, first on one side, then on the other.  This prevents the ease from shifting.

Step 7:
To encourage the edge of the collar to lay flat, trim the under collar seam to 1/4" and the upper collar seam to 3/8". 


Step 8:
Around the outside curve, snip the edges every 1/4".  Turn right side out and press, slightly rolling the upper collar seam to the underside about 1/16".  This way it will not be visible on the  outside edge.

Step 9:
Baste raw edges together on inner edge. If desired edge stitching or top stitching can be done at this time-before attaching to garment.   

Step 10:
Pin collar to neck edge right sides together matching centers and notch3es.  Attach by sewing from center back toward the front.  First one side, then the other.

Happy Sewing!


May 3, 2016

May & Mother's Day

This comes a few days early, but happy Mother's Day to all of you mother's out there!  To celebrate, we're offering up to a 40% discount when you purchase the Pants Fitting Course on DVD combined with the Pants Kit.

 
When you purchase the combination of the SFD Pants Kit and Pants Fitting Course DVD, you'll receive a 10% discount off of the Pants Kit (reg. $37.95) and a 40% discount off of the Pants Fitting Course (PFC) on DVD (reg $79.95).
That's a grand savings of $35.78.

  If you already have the SFD Pants Kit and you'd like to purchase just the Pants Fitting Course (PFC) on DVD, you'll save 30% (Saving $23.98).

**PS, if you're new to Sure-Fit Designs, please note that you will still need to order the Designing Stylus for drawing your Pants Kit pattern.

These specials can only be purchased from the Sales & Promotions web page.
Please click here. 

If you're curious to know what's covered in the Pants Fitting Course on DVD click here.

It really is the next best thing to being here in Oregon with me in one of my Fit & Sew Retreats.  Plus this DVD purchase includes a 1/2 hour Skype session.  

Happy Fitting and Sewing!


Apr 26, 2016

White Pants...Spring has Sprung

I rarely wear white pants, but I got inspired by our (finally) sunny April days after a month of less than desirable gray skies and constant rain in March.
JoAnn Fabrics has white stretch denim. The fiber content is 70% cotton, 28% polyester & 2% Spandex.  It's heavy enough to look similar to 100% cotton, but has the easy care of polyester and the stretch wearing ease of Spandex.


Since I didn't want to sew 'real jeans', I chose a combination of patterns and instructions from existing Sure-Fit Designs information, which is what I'm going to share with you.  And the best part is that since my pattern was from a previous pair of pants, they were sewn in a day, qualifying them for a Made in a Day project.

The basic style is from the pants designing book - Pants that Mix n Multiply - Style #1: Flared Leg Pants with Elasticized Waist Edge.
I wanted skinny legs instead of flared legs.  And I chose to crop the hem around calf length.
Watch this video on narrowing the legs.


Now the slightly stretchy fabric.  Did I size down or not?
I tested the stretch factor (comfortably stretching on the crosswise grain).


With the 2% Spandex, 10 inches actually stretch up to barely 11 inches - 10% stretch, or what I'd call a Limited Stretch Knit.


If this had of been a blouse, I wouldn't have done anything with the pattern (my body blueprint).  For these pants though, I used my pants pattern that already had been sized down to remove the 2" (5 cm) of ease that is in the low/full hip circumference (i.e. I'd already sized down about 1 to 2 dots) .  So I cut them out without any further ease reduction. But because I wanted skinny and relatively snug-fitting pants, I decided to baste all seams at 3/4" (1.9 cm) for a 'try-on' including the crotch seam (I left CF open so I could step into them). Basting when working with fabric that stretches is always a good idea since all knits stretch and feel different on.  I decided I liked the wider seam allowance, so I then ripped out the crotch seam and proceeded to sew them together.


After the darts were sewn, the double welt pocket went in.  For those of you who would like a sewing tutorial for the Double Welt Pocket, please read this previous blog - http://surefitdesigns.blogspot.com/2014/05/the-double-welt-pocket.html 

Then I ripped the left side seam basting and inserted the invisible zipper -

I'll be showing you how to insert an invisible zipper in a soon-to-be-released new DVD Beginner Sewing Series - Make It Sew.  Please watch your SFD newsletters and this blog for the release date information.

And on the inside, before I inserted the invisible zipper, I covered the bottom end of the zipper to prevent the 'zipper scratchies'.  What the heck are 'zipper scratchies'?  Take a few minutes to read this previous blog - http://surefitdesigns.blogspot.com/2015/03/zipper-scratchies.html 


I definitely kept the 3/4" (1.9cm) seam allowance width on all seams.

Then hemmed the legs with my Coverstitch Machine (which I love and use every opportunity that I can).  For those of you not familiar with a Coverstitch Machine, make sure to watch my Coverstitch (free) videos.  I'll post video #1 here.  To see all 3 in the series, please click here in the SFD Learning Center Video Library.
 

And lastly, I finished off the waist edge with1" (2.5 cm) wide, non-roll elastic.  You'll find the direction for this easy application in with the instructions for Style #1: Flared Leg Pants with Elasticized Waist Edge in the Pants that Mix n Multiply designing book.
 

This was a fun and easy pair of pants to sew.  They're extremely comfortable.  I'm sure I'll get lots of wear from them as summer comes on.  But primarily, I wanted you to see another easy project utilizing the Sure-Fit Designs resources that so many of you already have.


And just in case some of you are new to Sure-Fit Designs, the blouse I'm wearing is the Princess Line Blouse sewn from the Dress Kit and available as a downloadable Fashion Leaflet from this page - 


Happy Sewing,


Apr 19, 2016

Not your usual Princess Line

A while back I posted a number of different videos - 6 to be exact) on how to design princess lines with your Sure-Fit Designs Dress Kit bodice blueprint.  One of them was called: Princess Seam - Variation with Short Dart.

Joy (from Joyful Expressions and an avid SFD customer) has created her version of this process with this lovely blouse where she's used 2 different patterned fabrics but both in black and white.  It's hard to see the little 'shorty' dart because of the print fabric...but it's there.


If you'd like to see the video explaining how to design this underarm princess seam and still end up with a small short bust-shaping dart, please watch this short video:


Here's the back of Joy's blouse.


If you'd like to see the remaining videos in the princess seam series, just click on over to the Sure-Fit Designs Learning Center - www.sfdlearningcenter.com/Dress-Videos-Designing.html and look for D.13.1 through D.13.6.

Joy...thanks so much for sharing your SFD creations.

Kindly,


Apr 12, 2016

Cutest Bow Pocket...Learn How!

I've recently had a SFD customer write to tell me how pleased she was with using the Sure-Fit Designs Children's Kit.  She designed and made this great fitting shorts for her 9 year old daughter.  She added this cute pocket detail that she copied from a pair of designer shorts from one of her daughter's friends.  See her 'back side' highlighted by the white oval below.


Our SFD customer, Miranda (who prefers to remain anonymous), so kindly agreed to provide you a photo story of how to go about designing and sewing these pockets for your sewing projects.  I thought you might like to see how this detail is accomplished.

Step 1:
In case you can't read the cue cards:
The 'Bow' pieces consist of one rectangle 6" x 5" and one piece 3 1/2" x 2 1/2". The larger one being the 'bow' and the smaller one being the 'knot'.
The 'Pocket' pieces are two 5" squares that are cut on the bias.

Step: 2
Sew bow and knot pieces in half the length of the rectangle and sew with 1/4" wide seams.
Fold the pocket pieces in half.  Measure down 3" from the top.  Use the SFD Designer's Companion to curve the bottom of the pocket.

Step 3:

Turn the 'bow' and 'knot' pieces right side out and stitch ends of small piece.
Curve bottom of pocket and smooth out any ridges or bumps.

Step 4: 

Top of pocket - fold over 1/4" and press toward inside.
Slip 'bow' through center of 'knot' positioning the 'knot's' seam toward the underside.  Then baste either side of 'bow' structure to the sides of one of the pocket pieces.
Step 5:
 With right sides together, pin the pocket pieces together.  Sew the sides and lower curved edge.  Leave the top edge open for turning.

Step 6:
Turn right sides out.  Top stitch the upper edge closed.  Then simply attach to pants, shorts, shopping bag, coat, blouse or whatever project you think this pocket would look good on.

Have fun! 
And thanks again to Miranda (from the Pacific NW of the USA) for sharing her success story with all of us and providing the pictorial tutorial.

Kindly,

Apr 5, 2016

Oh My Muffin Top!

Got a muffin top? And not the kind you eat.  How best to deal with the SFD Dress Kit bodice waist-fitting dart and how to choose style most appropriate for your shape...that the focus of this blog and video tutorial.

What's a muffin top?  It's that little bit of extra fluff that you might have above your waistline.  Perhaps best shown in this illustration.
So what do you do with the waist-fitting darts when they initially taper down into a narrower waist?
This video will give you suggestions for a couple of alternatives when drawing and sewing the 'dart' for your test bodice.
And after you've finished your test bodice, you'll see 10 tips for actually dressing this body shape and styles that the experts say are most appropriate.  Of course choosing styles that skim your body and don't shape in completely at your waist are likely going to be best.

Here are some ready to wear design ideas.

And here are some of the style options that you can find with Sure-Fit Designs in our Digital E-Goods department.

Enjoy!